|
previous tutorial |
ACG home |
Instructor home |
Class home |
List of tutorials |
next tutorial |
Before beginning the project
- If you are working in the ACG Lab
click to read these important notes before you start the tutorial.
This section of the directions contains information that pertains specifically to the way the ACG Lab operates. It may not apply if you work on the project elsewhere.
- If you need to get for yourself the programs mentioned in this tutorial:
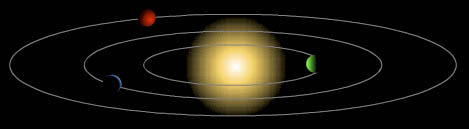
As it stands now, our map allows viewers to zoom in until they see a close-up
view of our geographical location. We also want them to
see where the Earth sits within the Solar System--just in case the Web ever
reaches transplanetary dimensions. To this end, we'll make a second picture, exploring some of the simpler drawing tools to create new elements, properly layered and rendered:
Click for a sample of the second picture you can look at (with the Shockwave for Flash plugin installed).
- If you do not have the plugin, here is a
(non-zoomable) snapshots of what the viewers would see:
After the second picture is complete, we will need to prepare our material for use on the
Web:
- Launch the FreeHand application and create a new document (File-->New)
- Resize the document page. The size and contents of the page determine what the browser will display when the map is first loaded.
- Make sure the measurement units (in the pop-up at the bottom of the document window) are set to 'Points'. The size of a typographical point roughly matches the size of screen pixels at the nominal resolution of 72 dpi.
- In the Document Inspector (rightmost tab in Inspector window, or use the Window menu to display it), choose Custom from the page size pop-up menu (below the pasteboard preview), press the horizontal format button, and enter 550 for the 'x' (width) and 350 for the 'y' (height) dimensions.
- Unlike GIF and JPEG files, vector images do not take up more space (and download time) as they are scaled up. We do, however, want to establish the correct proportions of width and height so the image will fit in our page without distortion.
- Double-click the name of the default "Foreground" layer and enter the new name 'Space'. Press Enter.
- Make sure that 'Space' is the only unlocked layer, and that it is the active layer (its name is highlighted).
- Draw a box filling the entire page.

- Choose the Rectangle tool in the toolbox.
- Use the magnification pop-up menu (bottom-left of the document window) to zoom out so you can see the entire page (Fit Page).
- Click at one corner of the page and drag to the opposite corner.
- Add a gradient fill to suggest the appearance of a glowing Sun.
- In the Fill Inspector (the middle tab at the top of the Inspector window), choose 'Gradient' from the top pop-up menu. Press the Radial gradient button (the one on the right, below the color pop-up). This should fill the box with a smooth gradation from white (at the center) to black (at the edge).
- In the Color List panel (Window menu) find the white swatch box and Option-drag it to where you would like to position the Sun. This will set the center of the gradient.
- In the Fill Inspector, click the black swatch box next to the top of the color ramp and drag it down along the edge of the color ramp itself. When you release the mouse button, a second black swatch box will appear. Drag this second black box towards the white box at the bottom of the color ramp to adjust the size of the Sun.
- For a sunnier look, use the Mixer panel (Window menu) to define a bright yellow color. then drag the resulting color sample to the Fill Inspector, creating a yellow swatch box next to the color ramp, between the black and the white boxes.
- One way to mix a suitable yellow is to click on the 'CMYK' button at the top of the Mixer (the 1st on the left) and drag all the sliders to the left, except the yellow slider (3rd from the top) which goes 3/4 of the way to the right.
- As a finishing touch, you can use the polygon tool to star-stud the background.

- Double-click the Polygon tool icon in the toolbox. In the dialog, choose 'Star' and drag the sliders to adjust the number and sharpness of the star points. Click 'OK' to close the dialog.
- Drag in the drawing window to create a star shape. Leavethe start selected.
- In the Fill Inspector, choose 'Basic' from the top pop-up menu. Choose 'White' from the color pop-up menu.
- In the Stroke Inspector (the 2nd tab from the left at the top of the Inspector window), choose 'None' from the top pop-up menu. This removes the outline from the selected object.
- Repeat the previous steps for additional stars.
- Lock the 'Space' layer by closing the padlock next to its name in the Layers palette.
return to top
- Create a new layer for the planets.
- In the Layers panel, use the 'New' command in the 'Options' pop-up to create a new layer.
- Double-click the name of the new layer and enter the new name 'Planets'. Press the Enter key.
- Make sure the 'Planets' layer is above the 'Space' layer. If not, you can drag the name of the 'Planets' layer in the Layers palette to achieve the correct sequence.
- Make sure that 'Planets' is the only unlocked layer, and that it is the active layer (its name is highlighted).
- Draw an oval to indicate the innermost planet's orbit.

- Choose the Ellipse tool.
- While holding down the Option key, click on the center of the Sun and drag out an oval. Make sure it does not intersect the brightest part of the Sun.
- In the Fill Inspector choose 'None' from the type pop-up. In the Stroke Inspector, choose 'Basic' from the type pop-up. Mix a middle gray in the Mixer panel and drag it to the color swatch in the Stroke Inspector.
- Draw the orbits of additional planets.

- Make sure the oval for the first orbit is still selected, then Edit-->Clone. This creates a second copy exactly registered to the first, so you won't see any difference in your drawing.
- Double-click the Scale tool in the toolbox to display the Transform panel with the scale tab selected.
- Change the scale percentage: use a number greater than 100 to magnify. Make sure 'Lines' is unchecked. Click 'Apply'.
- Repeat the process for additional orbits (make sure that the ovals don't get so large that they extend past the edges of the page).
- Draw and shade the planets.
- For each planet, Shift-Option-drag with the Ellipse tool to draw a circle straddling the planet's orbit.
- In the Stroke Inspector, choose 'None' from the type pop-up menu.
- In the Fill Inspector, set the type to 'Gradient', and choose the other settings as appropriate:
 For a planet beyond the sun, press the Radial gradient button and set the edge color (top swatch next to color ramp) to black, the bottom swatch to a light color. Adjust the center of the gradient as needed with the Locate Center control at the bottom of the Inspector.
 Planets in front of the sun require a radial gradient with a light edge color and black in the center. To improve the appearance of the crescent, slide a second black swatch up and adjust the center of the gradient.
 Planets alongside the sun look best with a straight gradient from a light color to black. Slide a second black swatch to adjust the fallof rate between day and night. Use the Angle of Taper dial to match the direction of the Sun.
return to top
- Deselect everything in the drawing (press Tab key).
- Display the URL Editor (Window-->Xtras-->URL Editor).
- In the URL Options menu, choose New to display the New URL dialog. Enter the URL (all lowercase) according to these rules:
- Your last name
- An underscore (Shift-hyphen)
- Your first name's initial
- An underscore (Shift-hyphen)
- map1
- A period
- The HTML extension: html
- Sam Sample's URL would be sample_s_map1.html
- Click 'OK'. The new URL entry appears in the URL Editor.
- In the drawing, select the shaded circle representing the Earth's position in the Solar System. Click on the new URL entry in the URL Editor to assign it to the selected object.
return to top
- Make sure to save your document (File-->Save). You'll need the FreeHand version of the document if you wanted to work on the image again.
- File-->Export. A Save dialog appears.
- Use the 'Format' pop-up menu to select 'Macromedia Flash (SWF)'
- Click the 'Options' button. Adjust the settings as follows, then click 'OK':
- Set 'Animation' to 'None'
- Set 'Pages' to 'All'
- Choose Medium compression settings--these trade off image quality for image size.
- Choose 'Flash 3' and turn off 'High Quality Printing' for Compatibility.
- The other settings do not apply to our project.
- Since FreeHand has the bizarre habit of changing exported filenames, just enter tmp.swf as the filename (we'll change it later).
- Find your folder on the desktop (the same where your other files are: HTML, GIF or JPEG, DCR). Click 'Export'.
- In the Finder, click on the name of the file you just exported. When the icon label highlights, enter the correct filename (all lowercase) according to these rules:
- Your last name
- An underscore (Shift-hyphen)
- Your first name's initial
- The digit 2
- A period
- The Shockwave Flash extension: swf
- Sam Sample would rename his file sample_s2.swf
return to top
- Re-open the file you worked on in the previous session (the one with the map of the Earth).
- Make sure the measurement units (in the pop-up at the bottom of the document window) are set to 'Points'. In the Document Inspector, resize the page to the same size as the Solar System image (550 width, 350 height).
- If necessary, move and/or scale all map elements, so that the picture of the entire world fits inside the resized page.
 In the Layers panel (Window-->Panels-->Layers), unlock all the layers (a shortcut to do this is to option-click any of the padlock icons).
- Edit-->Select-->All In Document
- Move all the selected items to the center of the newly resized page.
- Double-click the Scale tool (4th from the bottom in the toolbox) to display the Transform panel with the scale tab selected. Make sure 'Lines' is checked.
-
Click with the Scale tool in the center of the page and drag with the Shift key held down, until all elements are proportionally sized to fit the page.
- Lock all the layers.
- Repeat the steps listed for the Solar System document to export the Earth image as well as an SWF file. Rename it according to the following rules:
- Your last name
- An underscore (Shift-hyphen)
- Your first name's initial
- The digit 1
- A period
- The Shockwave Flash extension: swf
- Sam Sample would rename his file sample_s1.swf
return to top
- Find Aftershock on your computer's hard drive and launch it.
- A new untitled window appears. File-->Preferences. Uncheck 'View in Browser', then click 'OK'.
- Use File-->Add-->Shockwave to import your first SWF file (in Sam Sample's case, that would be sample_s1.swf).
- In the right half of the window, change the 'Scheme' pop-up menu to 'Shockwave Only'
- File-->Save. Enter the filename (all lowercase) according to these rules:
- Your last name
- An underscore (Shift-hyphen)
- Your first name's initial
- An underscore (Shift-hyphen)
- map1
- A period
- The HTML extension: html
- Sam Sample's first file would be named sample_s_map1.html
- Use File-->New to clear the window. Repeat the previous steps to import your second SWF file (in Sam Sample's case, that would be sample_s2.swf), and to save its Shockwave-only HTML file with the following name:
- Your last name
- An underscore (Shift-hyphen)
- Your first name's initial
- An underscore (Shift-hyphen)
- map2
- A period
- The HTML extension: html
- Sam Sample's second file would be named sample_s_map2.html
return to top
- Drag the icon of your homepage HTML file to the icon for SimpleText.
- This is the file with your name and the html extension, originally exported from PageMaker. For instance, Sam Sample's homepage file is called:
sample_s.html
- After the HTML file opens in a document window, click to place the insertion point where you want your viewers to find the link to the map.
- Make sure to click outside of existing tags (e.g., not between a '<' and a '>').
- Enter the tags and the text for the link. Sam Sample typed this:
- <A HREF="sample_s_map2.html">click to see a map of where I live</A>
- Make sure to substitute the correct filename (the one for the second HTML file generated by Aftershock), and the actual text that you want your viewers to click on.
- Use File-->Save to update the HTML file for your homepage.
- You can then use File-->Quit to exit SimpleText.
- Your new SWF files, the new HTML files, and the old HTML file with the new edit, are ready to post on the web.
return to top
Information specific to the ACG Lab
- On ACG Lab computers, the program Aftershock is in the Multimedia folder on each station's hard drive.
- On ACG Lab computers, the program FreeHand is in the Drawing folder on each station's startup drive.
- The Art Computer Graphics program of Fullerton College offers a class covering both FreeHand and Illustrator, ACG112 Electronic Illustration. Find it in the class schedule.
- When done, place the new web-ready items (two SWF files, two new HTML files, and your homepage HTML file) in the drop folder on the file server--so they can be posted to the web server.
return
|
previous tutorial |
return to top |
next tutorial |