|
previous tutorial |
ACG home |
Instructor home |
Class home |
List of tutorials |
next tutorial |
Before beginning the project
- If you are working in the ACG Lab
click to read these important notes before you start the tutorial.
This section of the directions contains information that pertains specifically to the way the ACG Lab operates. It may not apply if you work on the project elsewhere.
- If you need to get for yourself the programs mentioned in this tutorial:
- Art of Illusion is an open source program, freely downloadable at www.artofillusion.org.
This program will run on a variety of other computers besides Macintoshes.
- Imagery 3D is also freely downloadable at www.vargr.com/imagery.
- Art*lantis is a commercial program by Abvent.
- The QuickTime browser plug-in is free software by Apple Computer.
Rendering is the final step of a 3D graphics workflow. The computer creates a 2D perspective view (for animations, a sequence of views) of our scene.
In creating the image, the renderer program uses both the geometric attributes of the scene (which we established in the previous tutorial, modeling), and its rendering attributes. The latter include:
- Surface color
- Surface roughness
- Transparency
- Lighting
- Atmosphere
- Viewpoint (or camera) settings
In some cases, rendering settings can substantially alter the shape of the object, as is the case with displacement mapping, volumetric materials, and render-time solid operations (similar to solid modeling, but done by the renderer without altering the objects' geometry).
- To complete the 3D portion of our web page you will first return to Art of Illusion to export the model as a file that can be transferred to Art*lantis.
- In Art*lantis, open and set up the file exported from Art of Illusion.
- Choose the rendering attributes for the scene.
- Render a thumbnail image of the model, to be used for a hyperlink to the actual 3d panorama.
- Render an interactive QuickTime VR panorama of the inside of the room.
- Edit the homepage HTML file to add a link to the QuickTime VR file, using SimpleText.
- Start up Art of Illusion, then use File-->Open to load the 3D scene file created in the previous session.
- Select all the visible objects in the scene:
- Zoom the views as needed to see the entire scene. You can work in any one of the four viewports.
- Using any one of the Object tools (the green ones at the top of the toolbox) click above and to the side of the building, then drag to enclose it in a selection rectangle.
- Check the Object List to make sure that only the entries that are not greyed out are now highlighted.
- Do not use the Edit-->Select All command, which would select invisible objects as well.
- Export your scene in a commonly-used file format that other programs can import:
- File-->Export-->Wavefront (.obj)
- Choose 'Selected Objects Only' from the pop-up menu at the top of the dialog.
- Since the OBJ files that Art of Illusion creates can only contain polygon data, the curved surfaces in our scene will have to be converted.
The 'Maximum Surface Error' determines the accuracy of this conversion. A very small value yields smoother objects, at the cost of a larger file that may not import properly.
As a compromise, enter 0.01
- Since we have not assigned surface properties to our model yet, leave all other settings at their default values. Click <OK>.
- Enter any filename (this file won't be posted on the web). Click <Save>.
 Find the icon of the file you just saved, drag and drop it on the Imagery 3D application icon.
This will further convert your scene to a QuickDraw 3D file, a format that Art*lantis can import.
The new file will retain the name of the OBJ file, appended with the extension '.3dmf'
Find the icon of the file you just saved, drag and drop it on the Imagery 3D application icon.
This will further convert your scene to a QuickDraw 3D file, a format that Art*lantis can import.
The new file will retain the name of the OBJ file, appended with the extension '.3dmf'
- You can now quit Art of Illusion to free up memory.
| return to top |
- Look in the startup drive, System Folder, Preferences folder. If the file 'Art35.prf' is present, throw it in the Trash. This forces the program back to its factory defaults.
- Launch the Art*lantis program.
- File-->Preferences. Choose settings that will speed up the operation of the program and conserve memory:
- Choose a medium size for the preview window.
- Choose a medium # of refractions, and 1 reflection.
- Click the 'Select' button to find and choose the 'Shaders' folder in the same folder as Art*lantis.
- File-->Open; choose 'QuickDraw 3D Metafile' from the pop-up menu at the bottom of the dialog box; find and double-click the '.3dmf' file saved by Imagery 3D.
- As you work, render the scene whenever you need to check effects not displayed in the modeling window. Use the Render command in the Render menu.
| return to top |
- Use Windows-->Edit Fixed Cameras to display the 'Fixed Camera' window.
- Click the 'axis' button to display the camera placement window.

- Drag the camera symbol (a light blue box) to reposition it--the preview window will update to the new viewpoint.
- Drag the look-at symbol (the arrowhead) to reposition it--the preview window will update to the new camera direction.
- For different views of the camera location diagram, click on the sides of the cube icon at the bottom of the window.
- Use the hand and magnifier tools (icons at the bottom of the window) to focus on different areas of the model space.
- Check the preview window to make sure that you can see all the elements in your scene, including the ones inside the building. When done, close the 'Fixed Camera' window.
| return to top |
- Display the Lights palette (Windows-->Edit Lights).
- To better see the effect of lighting changes in the preview window, you may want to have Options-->Cast Shadows checked, then use Options-->Recalculate to update the window.
- NOTE: the renderings will only show the illumination cast by the lights. The lights themselves are invisible.
- Click <Create> to add a light to the scene, then adjust its settings.
- Make sure the new light is selected in the list at the top of the palette.
- Choose the light type by clicking on the sun button. This creates an infinite light casting parallel rays.
- Click the 'axis' button to display the light placement window.
- Drag the light symbol (a starburst) to reposition it--the preview window will update to the new illumination.

- The other controls in the light placement window are the same as in the camera placement window.
- In the Lights palette, click on the color picker to choose the light's hue.
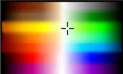
- Just above the color picker is the color saturation slider.

- Use the slider labeled 'Power' to adjust the brightness of the light.
- With this first light located outside the model, the inside of the room will be fairly dark.
- One solution is to lighten the shadows cast by the light using the 'shadows' slider. You can, in fact, turn off the shadows entirely (computer illumination doesn't have to comply with the laws of nature).
- A more realistic-looking solution, however, is to leave the 'shadows' slider set to a high density value. Then, do what you'd do in the real world: turn on a light in the room.
- Create and adjust a new light. This can be used to light the inside of the room, so details of your logo are more visible.
- In the Lights palette, click on the <Create> button to add an new entry to the list of lights.
- Make sure the new light is selected in the list at the top of the palette.
- Choose the light type by clicking on the lightbulb button. This creates a point light casting divergent rays.
- Use the light placement window to drag the new light inside the room. Make sure to check the position of the light from multiple views.
- Use the other commands in the Lights palette to adjust the color, intensity and radii (Max. Light and Max. Dist. sliders) of the new light.
- Again use Render-->Render for a more accurate view of the effect of your lighting settings.
| return to top |
- Choose Windows-->Reapply Material. This displays a window that lets you identify the parts of the scene so they can be assigned different surface attributes.
- Choose 'Select By Objects' (at the top of the window).
- Repeat for each one of the four objects in the scene (roof, wall/floor, pedestal, logo):
- Click <Create> to add an entry to the list of materials.
- Double-click the new entry to rename it. In the Rename dialog, type a descriptive name (e.g., roof), then click <OK>
- With the renamed entry selected in the list of materials, click on the corresponding object (e.g., the roof of the building) to select it.
- Click <Reapply>.
- When you are done creating and applying all four materials, close the Reapply Material window.
- A window appears, whose title bar bears the name of one of the materials you entered previously (if not Choose Windows-->Edit Shaders).
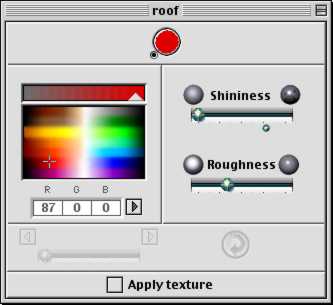
- Use Windows-->Display Materials List to see a window allowing you to select any of the materials in the model for modification.
- Use Windows-->Library to display a window with the material shaders that come with the program.
- To see thumbnails of additional textures, use the pop-up menu and the arrow buttons at the bottom of the Library window.
- When you see a shader you like, drag its icon and drop it on the name of a material in the 'Materials List' window.
- You can use additional controls (in the window with the same name as the material) to customize the shader. For instance, the image details in some shaders can be scaled.
- Use Render-->Render to see a clearer picture of the textures you applied.
| return to top |
- Bring up the Background palette using Windows-->Edit Backgrounds. This lets you add a backdrop to the rendering.
- Choose one of three color options: Uniform, Graduated, Graduated Line.
- Click the buttons at the top of the palette to select each of the color(s) used in the background. Use the color picker and the saturation slider to adjust the selected color.
- Bring up the Atmosphere palette using Windows-->Edit Atmosphere. This lets you add effects such as haze or mist. Beware of overly dense fogs which may obscure your scene completely.
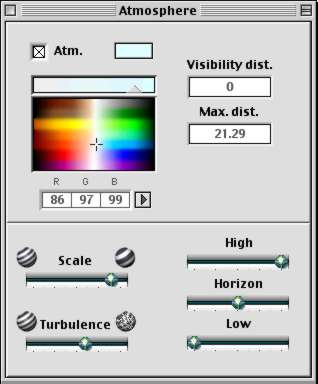
- Turn the fog on and off with the 'Atm.' checkbox
- Use the color picker and the saturation slider to adjust the color of the fog.
- Use the three sliders at the bottom-right (High, Horizon, Low) to change the fog density at different heights above the ground.
- Use the Scale and Turbulence sliders to change the detail appearance of the fog.
| return to top |
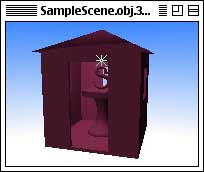
This picture will be used as a thumbnail for the link from your web page
to your 3D panorama file
- Use Render-->Render Fixed Cameras to display the rendering dialog.
- Enter the filename (all lowercase) according to these rules:
- Your last name
- An underscore
- Your first name's initial
- Another underscore
- logo
- A period
- JPEG image file extension: jpg
- Sam Sample's file would be named sample_s_logo.jpg
- Click the folder button next to the filename field to select your folder on the desktop.
- Choose 'JPEG' from the 'Doc Format' pop-up menu.
- Enter width and height (in pixels), in the appropriate fields. To keep download times short, keep the size small (320 x 240, for instance).
- Choose the other settings as shown in the picture below:
- Turn on the first four checkboxes (to enable the advanced features of the renderer).
- Turn off Alpha Channel (only useful if you were to composite the rendering with another image)
- Choosing higher values with the '+' and '-' arrows can be used to improve image quality, at the expense of longer rendering time (reflection only applies to mirror surfaces, refraction to transparent objects).
- Click 'Render Now'.
- A rendering window will open, and the rendered image will gradually appear. This rendering will take a bit longer, since there are many more computations involved.
- By default, the JPEG file with the rendered image will be automatically saved to the same folder as your Art*lantis document. Check that everything looks OK, then close the rendering window.
| return to top |
- Use Windows-->Edit VR Panoramas to display the 'VR Panoramas' window.
-
Click the 'axis' button in the 'VR Panoramas' window to display the panoramic camera placement window.
- Position the panoramic camera inside the room (this way, the viewers will have something to look at on all sides):
- Drag the camera symbol (a yellow box surrounded by a circle) within the walls.
- Drag the initial camera direction (the arrow) to determine what the viewers will see when they first download the panorama file.
- The Cube, Hand, and Magnifier controls are the same as in the fixed camera placement window. Make sure to check the position of the camera from multiple views.
 Click the camera button in the 'VR Panoramas' window to display the rendering dialog.
- Enter the filename (all lowercase) according to these rules:
- Your last name
- An underscore
- Your first name's initial
- Another underscore
- logo
- A period
- QuickTime file extension: mov
- Sam Sample's file would be named sample_s_logo.mov
- Choose the other settings as shown in the picture below:
- Choose 'QuickTime VR 2.0 Compressed' from the 'Doc Format' pop-up menu.
- Choose '160 x 120 test' from the 'Image Size' pop-up menu (this will automatically set the width and height fields as well).
- To keep download times short, choose the smallest size from the 'Resolution' pop-up menu, 'Low (1248 x 384)'.
- The checkboxes and '+' and '-' arrows are the same as in the fixed camera rendering dialog.
- Click 'Render Now'.
- A rendering window will open, and the rendered image will gradually appear. It will then be converted automatically to QuickTime VR format.
- By default, the .mov file with the rendered image will be automatically saved to the same folder as your Art*lantis document.
- Art*lantis cannot display QT VR files. In the Finder, double-click the icon of the .mov file to test it with QuickTime Player.
- Drag the pointer in the movie window to look around the room.
| return to top |
- Make sure the QuickTime VR file exported by Art*lantis (called 'yourname_logo.mov) is in the exact same folder as your other files for the web.
- Drag the icon of your homepage file (called 'yourname.html') and drop it on SimpleText
- Click to place the insertion point where you would like to see the thumbnail linked to your QuickTime VR logo scene.
- As always, make sure that the insertion point is not within a portion of text enclosed in angle brackets ('<' and '>'), and that it is within the 'BODY' container (after <BODY> and before </BODY>).
- Enter the tag to display the thumbnail:
- <IMG SRC="YourJpegFileNameGoesHere">
- Before the IMG tag, enter the start tag for the link to your QuickTime VR file:
- <A HREF="YourMovFileNameGoesHere">
- After the IMG tag, enter the end tag for the link:
- After following all of the above instructions, Sam Sample's HTML file would contain this entry:
- Click on the picture to see a 3D panorama:<P>
<A HREF="sample_s_logo.mov"><IMG SRC="sample_s_logo.jpg"></A>
To see this example of the QuickTime VR file, you will need a browser configured with the same QuickTime plug-in needed to play back the video project.
Before leaving, make sure you drop off your new .jpeg and .mov files, and the edited
HTML, for posting to the web server.
| return to top |
Notes
- A bump map is the simplest way to add surface detail to a model.
- Bump mapping uses a greyscale image which controls the tilt of the polygons' true surface normal, thus altering the shading to suggest raised and recessed areas. The simplest way to think about it is by analogy with height fields (see previous tutorial): bright values=raised, dark values=recessed.

- Since bump mapping does not alter the shape of the object, the illusion of raised and recessed detail falls apart at the edges of the object (shown on the right in the image below). By contrast, displacement mapping (shown on the left), uses a greyscale image to move polygons in and out. As a result, you see the arrow stick out its tip past the edge of the cylinder, and cast a shadow on the cylinder's surface.
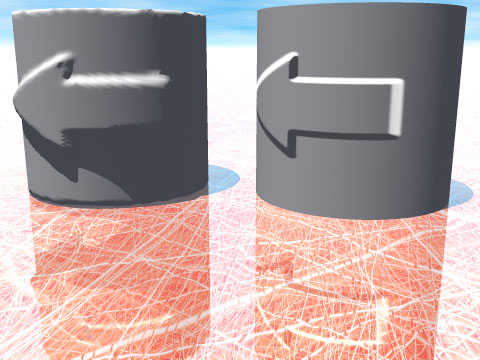
return
- Volume rendering uses a math formula to determine the areas where the object is opaque, transparent, or somewhere in between (as well as controlling color, reflection, and other surface attributes).
- The very different objects shown below are all simple boxes, with various volumetric materials applied to them:
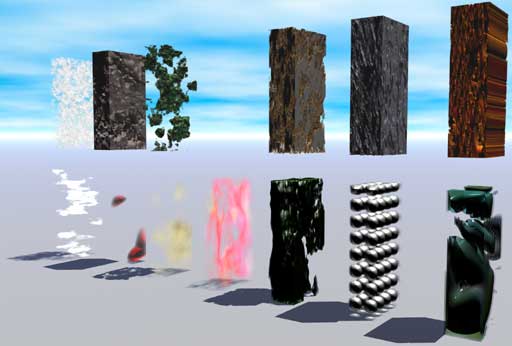
return
Information specific to the ACG Lab
- The applications Art of Illusion and Imagery 3D are in the 3D folder on the startup drive.
- The Art*lantis application is in the CAD folder on the startup drive.
- The QuickTime Player application is in the Video folder on the startup drive.
- Documentation on Art of Illusion and Imagery 3D is available on the ACG lab file server, in the ACG_DOCS volume.
- Look up in the class schedule
the Art Computer Graphics classes covering 3D topics, ACG120: 3D
Computer Graphics for Macintosh and ACG150: 3D Computer
Animation for Macintosh.
return
|
previous tutorial |
return to top |
next tutorial |