|
previous tutorial |
ACG home |
Instructor home |
Class home |
List of tutorials |
next tutorial |
Before beginning the project
- If you are working in the ACG Lab
click to read these important notes before you start the tutorial.
This section of the directions contains information that pertains specifically to the way the ACG Lab operates. It may not apply if you work on the project elsewhere.
- If you need to get for yourself the programs mentioned in this tutorial:
- In our previous session, we used Premiere to create the elements for our video. We will now use Premiere's editing features to assemble a finished piece from those same elements. First we
verify the program settings, then we proceed to:
- The final step is to
edit the HTML file for your web page, adding a link to the completed video file.
return to top
- Unlike video recording, which requires special hardware (video and sound digitizers), video editing can be accomplished (for small files) on any reasonably fast computer. To set up the computer's configuration:
- Use Apple-->Control Panels-->Memory
- If you find that Virtual Memory is on, turn it off. After you close the Memory control panel, use the Special-->Restart command in the Finder to reboot the computer.
- If Virtual Memory is already off, simply close the Memory control panel. There is no need to reboot the computer.
- Make a folder on the hard drive, then copy into it the title file and the video recording created in the previous session.
- This is especially important because Premiere needs plenty of space for temporary files, and plenty of speed--both unavailable on a removable disk.
- Look in the startup drive, System Folder, Preferences folder. Throw in the Trash both the 'Prem60.ini' and 'Adobe Premiere® 6.0 Prefs' files, if present. This forces the program back to its factory defaults.
- Launch Premiere. When the 'Initial Workspace' dialog appears, click the 'Select A/B Editing' button.
- The 'Load Project Settings' dialog appears next--click 'Custom' so we can choose our own settings.
- Finally, the New Project Settings dialog is displayed (if Premiere was already running, you could get to this point using File-->New Project). This dialog has several parts, each one selected from a pop-up menu menu in its upper-left corner. The relevant settings are:
- Video section:
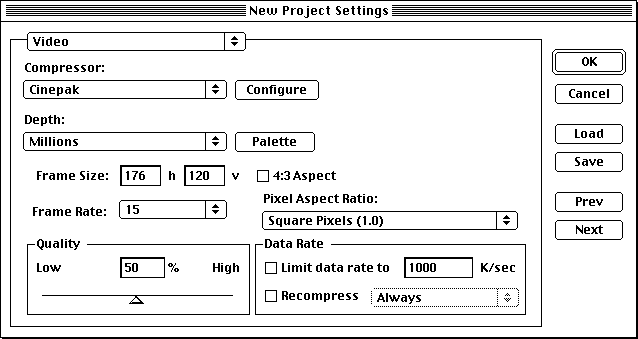
- Compressor--choose 'Cinepak'.
- This is the codec--the technique used to make the video file size smaller.
- Depth--choose 'Millions'.
- Different codecs offer different bit-depth choices--yielding different color ranges.
- Frame Size--uncheck '4:3 Aspect', then enter 176 h and 120 v. Make sure 'Pixe Aspect ratio' is set to 'Square'.
- To avoid distortion and changes in resolution, we match the aspect ratio and pixel size of the original recording.
- Frame Rate--choose 15 frames per second.
- The frame rate of the output file can differ from the frame rate of the recording. Just as we saw for animations, higher frame rate settings yield larger files.
- Quality slider--adjust to middle position.
- This slider is only available for the codecs which allow variable compression ratios. Just as we saw for JPEG compression of still pictures, higher image quality settings yield larger files.
- Data Rate--leave unchecked.
The data rate is a measurement of how fast the file must be loaded on the viewer's computer for smooth playback. Unchecking this option lets the codec set compression as needed.
- Audio section:
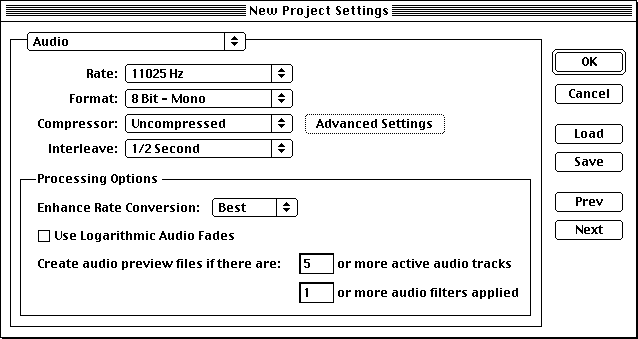
- In this section, we basically match the audio settings of the recording. If the sampling rate allowed by the recording hardware was too high, here we can lower it to 11025 Hz to reduce file size.
- Keyframe and Rendering section:

- For our simple project, we can leave the 'Rendering' options unchecked.
- The 'Keyframes' section controls the operation of the codecs which use 'inter-frame compression' (i.e., they exploit redundancies among contiguous frames to avoid storing repeatedly parts of the image which do not move). Leaving these options unchecked lets the default settings take effect.
- General section:
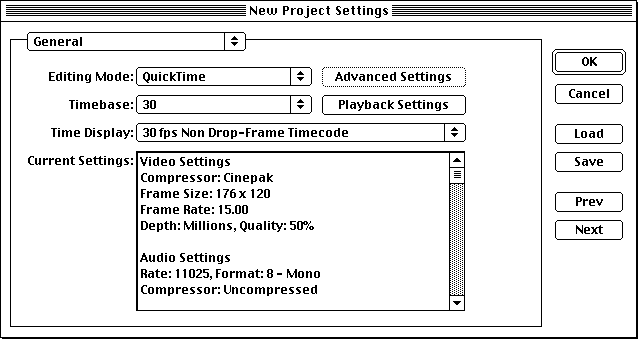
- Editing Mode--choose 'QuickTime' to indicate that we will be using the digital video software that comes with the operating system.
- Timebase--choose '30'. This is the nominal frame rate used for the project--it may be different from the frame rate of the final video file.
- Time Display--choose '30 fps Non Drop-Frame Timecode'. Since we are not working with broadcast video, time measurements need not take into account the fact that the NTSC frame rate is actually a bit less (29.97) than 30 frames per second.
- The 'Current Settings' list recaps the choices you made in the various sections of this dialog.
- When done establishing the various settings, close the New Project Settings dialog by clicking 'OK'. Premiere displays a number of windows, arranged to fit your screen size.
- Click on the Project window to make it active.
- Use File-->Save to store your editing project in the same folder with your title and recording files (you can choose any filename you like for the this file, since it won't be posted on the web).
- The Project file contains information on the whereabouts of all elements, and their placement on the timeline.
return to top
- Use File-->Import-->File to display the Import dialog.
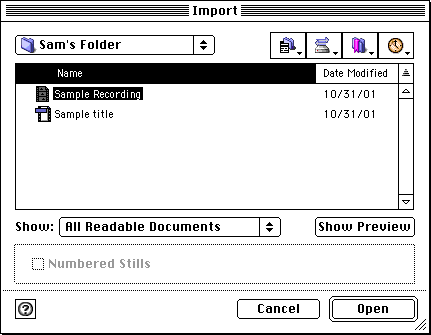
- Locate your title file, then click 'Open'.
- Repeat the Import procedure for your video recording file.
- Both files will appear as clips in the Project window.
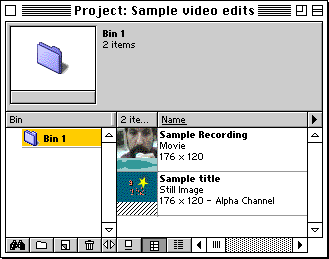
- Premiere needs to know when, and for how long, each element will appear in the final video. This is indicated by dragging each clip to an appropriate location in the Timeline window.
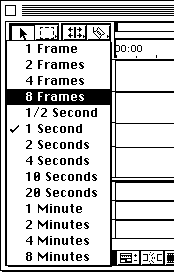
- If you have trouble determining time locations on the ruler, you can change its scale using the pop-up menu at the bottom-left of the Timeline window.
- In our setup, we asked Premiere to indicate times and durations using the format hours:minutes:seconds:frames. This is called SMPTE Timecode.
- Drag the title from the project window to the Video 1A channel (called A Roll), and position it so that its thumbnail is flush with the left edge of the window.
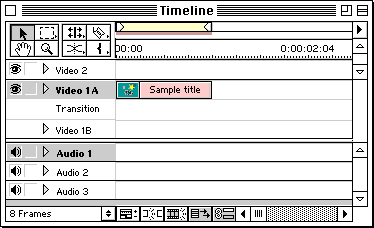
- To identify your clips more easily, you can use Window-->Window Options-->Timeline Window Options and turn on the display of thumbnails in the timeline, as shown in the illustration.
- Because of the delays in web playback, there is no need for a long 'hold' on the title card. With the arrow tool selected, place the pointer at the right edge of the title clip (the pointer turns to a double arrow) and drag left to the 1 second mark on the ruler, shortening the clip's duration.
- Before adding the video recording to the timeline, you may want to trim it (i.e., eliminate parts you don't need at the beginning and end):
- To trim a clip, start by double-clicking its thumbnail in the Project window.
- The Clip window appears. Drag the slider below the image to advance the recording to where you want to start its playback.
- Press the letter 'I' key on the keyboard to indicate the in point (start of playback).
- Drag the slider again to find the time when the playback should stop. Press the letter 'O' key on the keyboard to indicate the out point (end of playback).
- To add the video recording (trimmed or untrimmed) to the Timeline, drag its icon from the Project window to the Video 1B channel (the B Roll), and position it so that it starts a short time before the title ends.
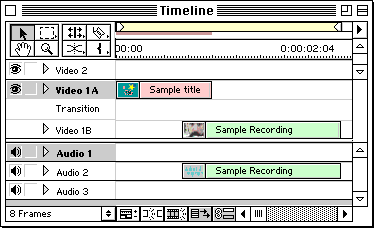
- This overlap between the two clips is meant to accommodate a transition.
- You have now assembled a simple video. You can see what your work looks like so far by previewing it:
- If necessary, extend the light yellow band at the top of the window (the Work Area) to encompass all your elements. Do this by dragging the white triangles on either end of the band.
- Use Timeline-->Preview to start playback.
return to top
- Transitions let you replace the abrupt change from title to video (a jump cut) with a visual effect (such as a wipe).
- If the Transitions palette is not visible, display it by using Window-->Show Transitions.
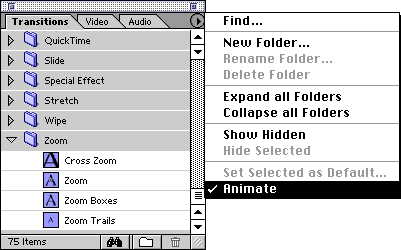
- Click the triangle to the left of each category of transitions (folder) to see thumbnails of the transition effects.
- The thumbnails for each effect can animate, previewing the result of using that transition to go from image A to image B. To turn on this feature, make sure the Animate command is checked in the Transitions palette menu.
- Scroll to find the transition you prefer. Drag the transition thumbnail to the Transition channel (the one between the A and B rolls) in the Timeline window, positioning it right where title and video recording overlap.
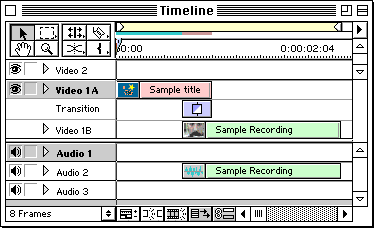
- Premiere will automatically size the duration of the transition to match the amount of overlap.
- Use Timeline-->Preview again (or press the Enter key on the numeric keypad) to see the revised version of your video.
return to top
- Save your edited project (you will need it again for any modifications): File-->Save.
- Use File-->Export Timeline-->Movie to generate the final version of your edited video.

- In the dialog box that appears, enter the filename in the format:
sample_s.mov
using your last name and first name initial.
- The output settings we chose at the beginning of the project are recapped at the bottom of the dialog. If incorrect, you can click the 'Settings' button to fix them.
- Click 'OK' in the Export Movie dialog to start outputting the file that you will use in your web page.
- When done, Premiere will automatically open the new video file in a Clip window, so you can check your work. Pay attention, in particular, to the effects of compression on image quality.
- If your movie turned out as you wanted, make sure to use File-->Save to update your project, then quit Premiere and dispose appropriately of its files:
- The Premiere project and your source files (the original video recording and the title card) are needed if you want to make changes to your edits at a later time.
- The folder of preview files that Premiere creates can be tossed out.
- The .mov file will be linked to your homepage in the following step of the tutorial.
return to top
- Make sure all your files for the web are in the exact same folder. This includes:
- the QuickTime video file exported from Premiere (called 'yourname.mov)
- the thumbnail digitized with the QuickCam (called 'yourname_video.jpeg)
- the HTML file for your homepage (called 'yourname.html')
- Drag the icon of your homepage file and drop it on SimpleText's application icon.
- Click to place the insertion point where you would like to see the thumbnail linked to your QuickTime video.
- As always, make sure that the insertion point is not within a portion of text enclosed in angle brackets ('<' and '>'), and that it is within the 'BODY' container (after <BODY> and before </BODY>).
- Enter the element to display the thumbnail:
- <IMG SRC="yourname_video.jpeg" WIDTH=352 HEIGHT=240>
- Now enclose the IMG element inside a hyperlink container element:
- Before the IMG element, enter the start tag for the link to your QuickTime video file:
- After the IMG element, enter the end tag for the link:
- After following all of the above instructions, Sam Sample's HTML file would contain this entry:
- Click on the picture to see a short video:<BR>
<A HREF="sample_s.mov"><IMG SRC="sample_s_video.jpeg" WIDTH=352 HEIGHT=240></A>
- After successful testing (by dragging the homepage file's icon to the browser's icon or window), the new .mov and .jpeg files, and the revised .html file can be posted on the web.
return to top
Notes
- The key notion for understanding data compression is redundancy. Whenever the same information is repeated in a regular pattern, a compression program can find ways to 'write it down' in a more compact format.
- The two main categories of compression algorithms are:
- lossless--which simply take advantage of existing redundancy in the data. A straightforward technique is Run-Length Encoding (RLE), which stores each repeating data item, and the number of consecutive times it occurs. This works best with 'line art'--images with solid areas of color.
- lossy--which create additional redundancy in the data by making it more uniform. The drawback is that some details (such as fine color differences and minute details) will be wiped out, but the result is a smaller file even when the original data (such as most photographs) has few repeating features.
- In most cases, lossy compression codecs provide a choice of quality levels--lower quality equals smaller files.
- In the case of video, codecs can exploit redundancy across frames as well. Accordingly, video codecs will use one, or both, of the following:
- Intra-frame compression--this is the same type of compression (lossy or lossless) used for still images, and is applied separately to each frame.
- Inter-frame compression--looks for features that are repeated unchanged from frame to frame. As long as some part of the image doesn't move, it can be recorded once when it first occurs (key frame) and reused for subsequent frames (delta or difference frames) without taking up additional space in the file.
- For this to work effectively, care should be taken to minimize unnecessary motion: camera on a tripod, good lighting (to reduce random image noise), static backgrounds, fewer edits, etc.
return
- Codec stands for Compressor/Decompressor. Many codecs have been devised, each offering specific trade-offs between image quality, file size, amount of time taken to compress the file, resources needed on the viewer's computer for smooth playback, compatibility with various computer platforms, ease of access to individual frames for editing, etc.
- For web distribution we need an aggressive codec which will squeeze down the file size significantly. While Cinepak is not necessarily the highest-quality codec for this application, it has been around for a long time--and is therefore more likely to be available on your viewers' computers.
return
- We are creating a hyperlink that will bring up the movie separately from our main web page.
- While it is possible to embed the movie directly in our homepage, keeping it separate gives viewers the choice to download the video, or pass on it because of its size.
- For more details on embedding media supported by the QuickTime plug-in, visit http://www.apple.com/quicktime/authoring/embed.html.
- We are also seeing how two HTML elements we learned earlier can be combined to create a hypertext link (using the <A> tag with the HREF attribute) attached to an image (displayed with the <IMG> tag) rather than text.
return
Information specific to the ACG Lab
- On ACG Lab computers, the program Premiere is on the startup drive, inside the Video folder.
- On ACG Lab computers, the program SimpleText is on the startup drive, inside the Text folder.
- In the ACG Lab, documentation on Premiere is on the ACG_DOCS volume of the ACG file server.
- The Art Computer Graphics program of Fullerton College offers a class covering digital video in detail, ACG66-Multimedia Video. Look it up in the ACG Class Schedule.
return
|
previous tutorial |
return to top |
next tutorial |