Soundtrack completion using SoundEdit and Director
|
ACG Home |
Instructor Home |
Class Home |
list of tutorials |
This is the final phase in the creation of an animated element for our web page. To complete the soundtrack and the animation we will:
For the first step we return to SoundEdit; the following two steps will be done in Director; for the last step we will use a text editing program.
- Re-open your sound file using SoundEdit.
- Adjust the waveform display to better see the parts you are interested in (zoom in/out as needed).
- Click in the waveform display, and drag to highlight the portion of the sound that you want to modify.
- If you had previously labeled the segment you want, just click on its Label and it will be selected again.
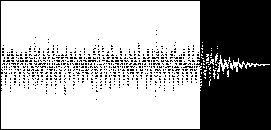
- Once you are satisfied with your selection, apply to it one or more of the commands from the Effects menu. As always, make sure that you have a backup of your sound in case you cannot undo an experiment you end up not liking. Below are some examples based on this original waveform:

- Amplify
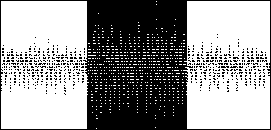
- Fade in
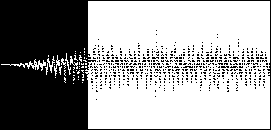
- Fade out
- You can also use commands in the Insert menu, such as Tone and Noise
- Note that these commands can also be used when an insertion point, rather than a selection, is active. Inserting the requested length of tone or noise will increase the total duration of the sound.
- When done, make sure all your sounds are saved (as AIFF files), then quit SoundEdit to free up memory.
| return to top |
- Launch Director and re-open your animation file.
- Use the Import command in the File menu to find and open the sounds you have edited. Make sure the file frmat pop-up menu is set to 'All Files' or 'Sounds', otherwise you won't be able to see your files. Make sure the bottom pop-up menu is set to 'Standard Import'.
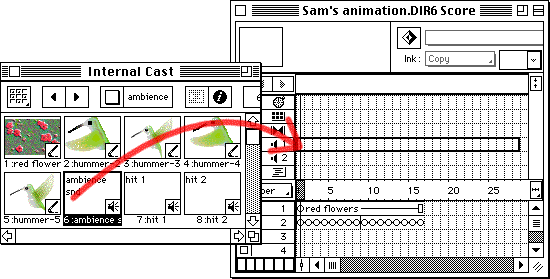
- Display and scroll the Cast window, if necessary, to see the sound cast members that you just imported into your animation file (they will be marked with a loudspeaker icon).
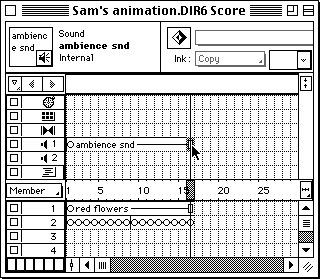
- Click to select the sound that you intend to loop as background ambience. Click the button marked with an 'i' at the top of the Cast window:
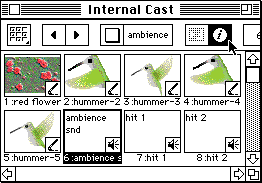
- In the Properties dialog that appears, turn on the 'Loop' checkbox. This will force the sound to repeat. Click 'OK' to close the dialog.
- Display the Score window. If necessary, click the Hide/Show button in the right margin to display the Effects Channels. You should see the Sound channels, indicated by loudspeaker icons.
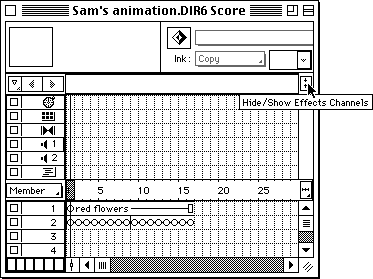
- Drag the looped ambience sound from the cast window to the first frame of sound channel 1 in the Score:
- Adjust the duration of the sound (by dragging its resize handle) to match the duration of the animation.
- Drag the hit sound(s) to the appropriate frames in the animation, in sound channel 2 of the Score. Adjust their duration(s).
- Play back the animation. If everything sounds OK, Save the file in preparation for conversion to Shockwave format.
| return to top |
- In the Xtras menu, choose the 'Shockwave for Audio Settings' command. In the dialog that appears, adjust the settings to minimize file size while retaining as much audio quality as possible:
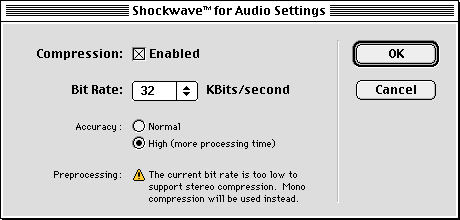
- Turn on the 'Enabled' checkbox for Compression.
- Choose the lowest number from the Bit Rate pop-up menu
- Turn on the 'High' option for Accuracy (this shouldn't make your wait too long if you kept your sounds small).
- Click 'OK' to close the dialog box.
- In the Modify menu, choose the 'Playback' command from the 'Movie' submenu. In the dialog that appears, choose settings that let viewers see you animation sooner (before it completes downloading):
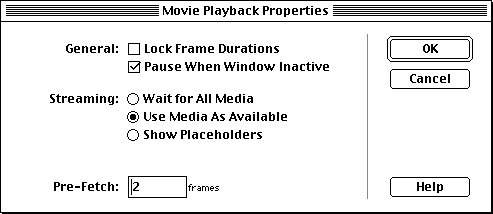
- The 'General' options do not affect download time and can be ignored.
- Choose 'Use Media as Available' for Streaming.
- Under Pre-Fetch, enter the number of initial frames in your animation containing different cast members.
- Click 'OK' to close the dialog box.
- Make sure your animation is saved (File-->Save). Any eventual edits to your animation must be made to the original Director file, because the Shockwave file cannot be changed.
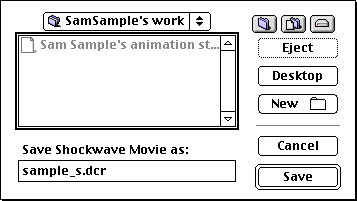
- In the File menu, choose 'Save As Shockwave Movie'. When prompted to save the Shockwave file, find your folder on the desktop, then enter the filename (all lowercase) according to the following rules:
- your last name
- followed by an underscore (shift-hyphen)
- followed by your first name's initial
- followed by a period
- followed by
dcr
- as an example, Sam Sample's Shockwave file is called
sample_s.dcr
Click 'Save'. A progress bar will appear while Director processes your animation.
- Before you quit Director, make a note of the size (in pixels) of your animation (see 'Width' and 'Height' in the Modify-->Movie-->Properties dialog).
| return to top |
- Find SimpleText on your computer's hard drive and launch it.
- In the untitled document which appears, create the basic framework of a generic HTML document. Type the following HTML tags, each on a separate line terminated by a return
(the left angle bracket '
<' is shift-comma, the right angle bracket '>' is shift-period):
<HTML>
<HEAD>
</HEAD>
<BODY>
</BODY>
</HTML>
- Press return after the
<HEAD> line to insert a blank line. On the blank line enter the TITLE tag pair:
- a left angle bracket (shift-comma)
- followed by
TITLE
- followed by a right angle bracket (shift-period)
- followed by whatever title you want viewers to see in the titlebar of the browser window
- followed by a left angle bracket (shift-comma)
- followed by
TITLE
- followed by a right angle bracket (shift-period)
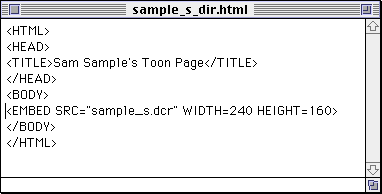
- as an example, Sam Sample's HTML file contains this line:
<TITLE>Sam Sample's Toon Page</TITLE>
- Add a blank line between the two 'BODY' lines and enter the tag to call up the animation:
- a left angle bracket (shift-comma)
- followed by
EMBED SRC=
- followed by the name of your dcr file, enclosed in double quotes
- followed by a space
- followed by
WIDTH=
- followed by the width of your animation in pixels
- followed by a space
- followed by
HEIGHT=
- followed by the height of your animation in pixels
- followed by a right angle bracket (shift-period)
- as an example, Sam Sample's HTML file contains this line:
<EMBED SRC="sample_s.dcr" WIDTH=240 HEIGHT=160>
-
File-->Save. Enter the filename (all lowercase) according to these rules:
- Your last name
- An underscore (Shift-hyphen)
- Your first name's initial
- An underscore (Shift-hyphen)
dir
- A period
- The HTML extension:
html
- as an example, Sam Sample's file would be named:
sample_s_dir.html
and it would look like this:
| return to top |
- Drag the icon of your homepage HTML file and drop it on the icon for SimpleText.
- This is the file with your name and the html extension, originally exported from PageMaker. For instance, Sam Sample's homepage file is called:
sample_s.html
-
After the HTML file opens in a document window, click to place the insertion point where you want your viewers to find the link to the animation.
- Make sure to click outside of existing tags (e.g., not between a '<' and a '>').
-
Enter the tags and the text for the link. Sam Sample typed this:
-
<A HREF="sample_s_dir.html">click to see the Sample Show of sound and animation</A>
- Make sure to substitute the correct filename for your new web page, and the actual text that you want your viewers to click on.
-
Use File-->Save to update the HTML file for your homepage.
- You can then use File-->Quit to exit SimpleText.
-
Place the new DCR file, the new HTML file, and the old HTML file with the new edit,
in the drop folder on the file server--so they can be posted to the web server.
| return to top |
Additional Info:
- The Art Computer Graphics program of Fullerton College offers a class covering the integration of various sound formats into HTML documents, ACG164-Multimedia Authoring, listed in the class schedule.
Copyright by Sandro Corsi. Last modified 7 APR 1999.