Scanning images with the Hewlett-Packard ScanJet IIc scanners
|
ACG Home |
Instructor Home |
Class Home |
list of tutorials |
Tutorial description
A scanner is a device that translates an image into digital information that can be displayed and edited on the computer. Different types of scanners address different price, quality, and image format requirements. The H-P scanners we will use are flatbed scanners, suitable for reproducing flat reflective artwork at medium-high quality and low cost.
The colors in the images created by this kind of scanner are in RGB format, one of several color models. The quality of the color rendition is tied to the file size and the amount of display memory, as determined by the way that computers handle colors.
Step-by-step operation
- The scanners can only be used from the computers directly attached to them (they are not available through the network). Bring your floppy disk along and prepare the scanner if not already set-up.
- Make sure that the knob on the SCSI switch (the small putty-colored metal box next to the scanner), if present, is turned to "Mac"
- Turn on the scanner (the switch is on the right side, towards the back). A green light on the front should go on.
- Turn on the Macintosh connected to the scanner.
- Place your image face-down on the glass plate of the scanner, with the upper-right image corner near the red document set mark.
- Launch the scanner software, DeskScan II, located on the hard drive, in the Scanner folder
- The DeskScan window appears, with a preview area on the right and scanning controls on the left.
- If you need information on the program's operation, use the "Help" menu. Also, most dialogs have a "Help" button.
- Preview the image.
- Click the "Preview" button at the bottom of the screen. DeskScan will activate the scanner, display and select a reduced view of your image, and automatically adjust exposure and select image type
- If necessary, change the image type, by clicking and holding on the popup menu next to "Type" (upper-left of the "DeskScan II" window); scroll to the desired image type and release.
- Millions of Colors: use for any color image with smooth changes in value, hue, saturation, such as color photographs, pastel drawings, etc. DeskScan will record the full range of colors the scanner is capable of detecting, yielding a large file, good for higher-quality printing and screen display. Photoshop "RGB Color" mode.
- If necessary, change the print path. Click and hold on the popup menu next to "Path" (upper-left of the "DeskScan II" window); scroll to the desired print path and release. The chosen path, in combination with the image type, will affect both the resolution (amount of detail) of the image, and the brightness/contrast adjustments (and, if applicable, the color balance).
- For images that will be displeyed on the computer screen (like our web pages), choose "Screen".
- If necessary, adjust the selected area in the preview window:

- For a more detailed preview, click "Zoom". This causes the scanner to rescan and display a larger preview image.
- Click and hold on the sides of the selection, drag them to desired position.
- Click the Auto Exposure icon (the Yin-Yang circle symbol between the "Brightness" and "Contrast" sliders). This re-adjusts the exposure automatically. You may also use the sliders themselves for manual adjustments.
- Scale the image to the appropriate size in pixels:
- If the measurement unit under the Scaling slider (left-center of the "DeskScan II" window) is not "pixels", use the Custom-->Image Size command. In the Image Size dialog, choose Pixels from the Units pop-up menu.
- Drag the scaling slider. The corresponding image size in pixels is displayed below the slider. For a web page image, do not exceed approx. 320 x 240 size.
- Click the "Final" button to scan your image with the desired settings. Select "PICT" as the image format, then save to your floppy disk and return to your computer.
- To see the image you scanned, drag its icon on the icon of the program Photoshop (in the Paint folder on your Hard Drive)
Notes:
- Colors are often organized in color-space models to allow precise description and handling. There are two basic types of such models: the ones classified according to the primary colors they use, and the ones that conform more closely to human perception.
- Primary-colors models are in turn divided into subtractive colors and additive colors.
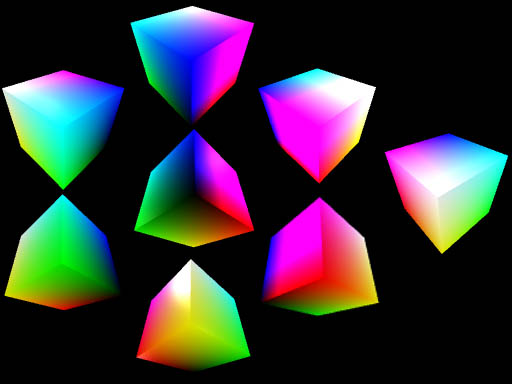
This picture shows 8 views of a color cube model, each centered on one of the color corners: Black is in the center, surrounded by the RGB primaries and their secondaries (which are, in turn, the CMY primaries). To the side is the opposite side of the cube, showing the White corner.
- Additive colors (RGB)
- Called additive because higher values of the primaries in a color mix add more light, yielding a lighter color.
- Applies to images on displays emitting light, such as computer and video screens.
- The additive primaries are Red, Green, and Blue (forming the acronym RGB), and determine the color of the phosphors used in monitors.
- Subtractive colors (CMYK)
- Called subtractive because higher values of the primaries in a color mix subtract light, yielding a darker color.
- Applies to images which do not emit light, and can only be seen when illuminated by an outside light source.
- The subtractive primaries are Cyan, Magenta, and Yellow. To these, to compensate for the imperfections of pigments, is usually added a fourth color, Black. The model is therefore also known as CMYK, and determines the colors of the inks used in process (= full-color) printing.
- Perceptual models
- Models based on human percepion try to account for our subjective understanding of color. There are at least two versions, Hue Saturation Luminance (HSL), and Hue Saturation Value (HSV), but we can ignore the differences among them for this discussion.
- Hue indicates the place in the color "rainbow" (Purple vs. Yellow vs. Green, etc.)
- Saturation indicates the distance from neutral gray (also: the amount of complementary hue mixed to the color)
- Luminance, or Value (or brightness) indicates the amount of light emitted (or reflected) by the color.
| Return to Top |
- A computer screen is better understood through the RGB model: if you look closely at a color TV or monitor you will see that all colors are made up of clusters of tiny red, green, and blue dots.
- The number of bits per pixel (amount of memory) determines the number of colors that can be shown. The added twist is that there are two ways that you can use the bits assigned to each pixel.
- Systems with 8 bits per pixel (or less) use a two-step process to choose different sets of colors based on the requirements of the image shown. An 8 bit-per-pixel video card offers a choice of up to 256 different colors at once. The palette itself, however, can contain more than 256 colors -- in most cases, over 16 million. This arrangement, called color mapping, involves:
- Use all bits to come up with a single number, used as index into a color palette, or Color Look-Up Table (CLUT)
- Index number leads to a pigeonhole in the palette
- Actual color "recipe" is in the pigeonhole
- Systems beyond 8 bits can display enough simultaneous colors to dispense with the color mapping mechanism. In a 24 bit display, for instance, close to 17 million colors are available, resulting in a "true-color" image. This arrangement, called direct color, involves:
- Divide available bits among 3 primaries
- The 3 numbers themselves are the "recipe" for the pixel's color
- For exanple, starting with 24 bits, 8 bits each will be assigned to R, G, and B -- allowing 256 different intensity levels for each one. A pixel with R=255, B=255, G=255 will appear white. A pixel with R=0, B=0, G=0 will appear black.
- Computer printers are built around the CMYK model, as traditional printing presses are.
- Number of colors printed
- Depends on amount of information received from the computer
- Depends on print engine capabilities
- Range of ink or toner colors
- Size of printer dots relative to halftone screen frequency
| Return to Top |
Additional Info:
- You will find a thorough description of many issues concerning color, both on and off the computer, in the "Interactive Color" presentation created by the San Diego Supercomputer Center. A copy is available in the instructor's folder on ACG_FILE.
- Most classes in the Art Computer Graphics program of Fullerton College deal at least briefly with scanners. For in-depth instruction, look to the classes ACG132-Electronic Paint, and ACG146-Desktop Publishing II. Find these classes in our class schedule.
Copyright 1996-99 by Sandro Corsi. Last modified 17 Feb 1999.