Recording video using Premiere
|
ACG Home |
Instructor Home |
Class Home |
list of tutorials |
Premiere is the most widely used program for Desktop Video--recording and editing for multimedia (CD-ROM, Web) applications. While higher-end programs exist for non-linear video editing for industrial and broadcast applications, Premiere provides the most valuable features at a much lower cost.
Basic Operation:
- Go to one of the Macs with video input (Power Macintosh 7500/100). Change the configuration of the computer for video work:
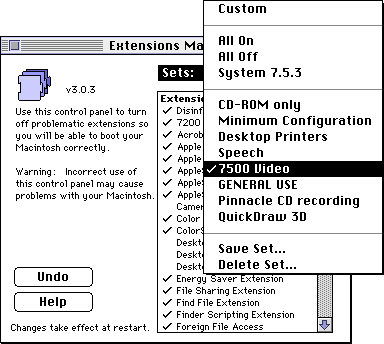
- Use Apple-->Control Panels-->Extensions Manager. Select the set '7500 video'.
- Special-->Restart
- Check that the video camera is turned on (see that the red light on the power supply is on--if not, use the ON/OFF switch, on the power supply itself). The barrel of the camera lens should rotate to focus automatically.
- Turn on the lights next to the camera for the best illumination.
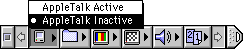
- When the computer is back up, turn off AppleTalk
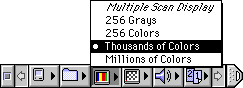
- Switch display to thousands of colors
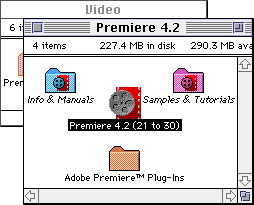
- Find the Premiere application icon in the Video folder and start the program:
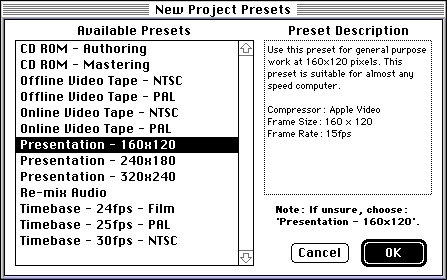
- When the New Project Presets dialog appears, select 'Presentation-160x120' and click 'OK'.
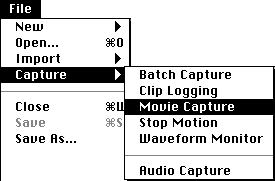
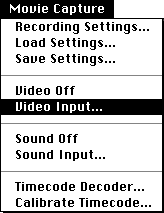
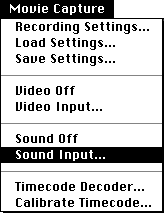
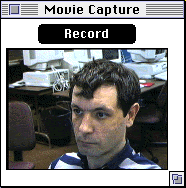
- From the Capture submenu of the File menu, choose Movie Capture. This will bring up a new window where you should see a live feed of the video from the camera hooked up to the computer. Also, a new 'Movie Capture' menu will be added to the menubar.
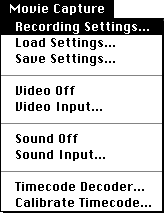
- From the new 'Movie Capture' menu, choose 'Recording Settings'.
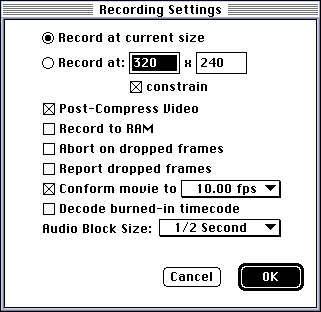
- Enter 160 (width) by 120 (height) for the recording size. Check the following options: 'Post-Compress Video', 'Conform Movie to 10.00 fps', 'Audio Block Size 1/2 Second'. These are not necessarily the best settings for highest-quality results, but they should allow you to fit your video recording on a floppy disk (if you keep it short).
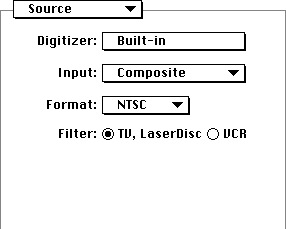
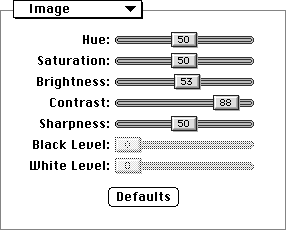
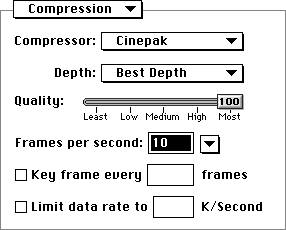
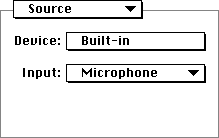
- Use Movie Capture-->Video Input. This will bring a dialog box with three sets of options, displayed in turn by using the pop-up menu in the upper-left corner of the dialog. On the right you should also see live video from the camera, to allow you to preview adjustments.
- Choose 'Source" from the pop-up menu (upper-left of dialog). Make sure the following options are selected: 'Digitizer Built-In'; 'Input Composite'; 'Format NTSC'; 'Filter TV'.
- Choose 'Image' from the pop-up menu. Adjust the slider to get the best possible preview image. If the lighting is not bright enough, you will probably need to boost contrast somewhat. If possible, avoid increasing Sharpness above its default level of 50, since it will add random artifacts (noise) to the image, making it harder to compress.
- Choose 'Compression' from the pop-up menu. Select the following options: 'Compressor Cinepak'; 'Depth Best Depth'; 'Quality 100'; 'Frames per Second 10'. Leave the other options unchecked, then click OK to close the entire dialog. If you find that the file size is too big, return to this dialog to lower the Quality slider and re-record.
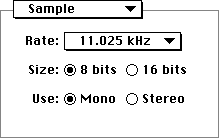
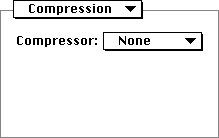
- Use Movie Capture-->Sound Input. This will bring up another dialog box with three sets of options, displayed in turn by using the pop-up menu in the upper-left corner of the dialog. On the right there is an additional section with a meter to check sound levels.
- Choose 'Source' from the pop-up menu. Select the following options: 'Device Built-In'; 'Input Microphone'.
- Choose 'Sample' from the pop-up menu. Select the following options: 'Rate 11.025 kHz'; 'Size 8 Bits'; 'Use Mono'.
- Choose 'Sample' from the pop-up menu. Select 'Compression None'. This is the safest setting at the moment to avoid incompatibilities.
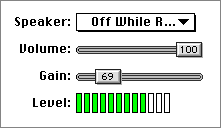
- In the section to the right, select 'Speaker Off While Recording' (this avoids possible feedback noise). With the Volume slider set to 100, speak into the microphone and adjust the Gain slider so that a consistently high number of green bars is visible, avoiding red bars. Remember to speak in the same manner later on during the actual recording.
- Click on the Record button in the Movie Capture window. The preview image will disappear briefly. When it re-appears (at a reduced frame rate), start your shtick. When done, click the mouse button anywhere.
- Make sure to save your recording: File-->Save.
Additional Info:
- The Art Computer Graphics program of Fullerton College offers a class covering video in detail, ACG66:
Multimedia Video. Look it up in our class schedules.
Last modified 1 SEP 97 by Sandro Corsi