Creating animation components using Director
|
ACG Home |
Instructor Home |
Class Home |
list of tutorials |
Director is a tool for multimedia creation based on VideoWorks, one of the very first Macintoh programs. Director is among the most popular tools for producing interactive material for CD-ROMs, and through a technology called Shockwave it can now be used to enhance Web pages.
Director comprises two distinct layers of features:
- 2-D Animation: the process of creating several slightly different pictures which, when displayed in rapid sequence, create for the viewer the illusion of motion. Director includes capabilities for painting the individual pictures, and
- Interactive Multimedia: gathering and integrating elements of various kinds (text, video, sound, etc.), with the addition of controls that allow the viewer to determine the course of the presentation.
For our project, we will use Director's animation features to create Shockwave files that will be displayed in our web pages.
Basic Operation:
-
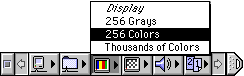
Set the computer display to 256 colors, so that your pictures will be automatically set to 8 bits per pixel of color content (this will reduce file size). You can use the Control Strip (displayed by clicking on the tab "protruding" from the margin of the screen):
- Open the windows you will need for this first part of the animation process (you can use the Window menu to do it).
- There will also be a third window (non-draggable, non-resizable) on the screen--this is the Stage, and while we won't need it now, it is always open. All other windows can be closed.
-
Set the width and height of the animation to a small size for quicker download:
-
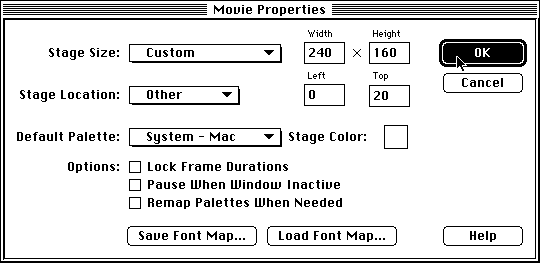
Use the Modify-->Movie-->Properties command to display the Movie Properties dialog
-
Set the Width to 240 and the Height to 160; the Left location to 0 and the Top location to 20; leave Default Palette at "System - Mac".
-
If necessary, you can choose a slightly larger movie size, but keep in mind that this will generally increase the file size, though the actual size of the file is affected by a number of other settings as well.
-
Leave the three check boxes at the bottom of the dialog unchecked. Click 'OK'.
Animation contents
-
Avoid registration problems by animating characters that fly or swim. Walking characters must be aligned with the ground accurately to yield convincing motions.
-
Minimize the length of the animation by making sure that the beginning and the end of the motion are the same. This allows you to loop the animation (i.e., play it indefinitely), thus getting greater mileage from a small file.
Import images
-
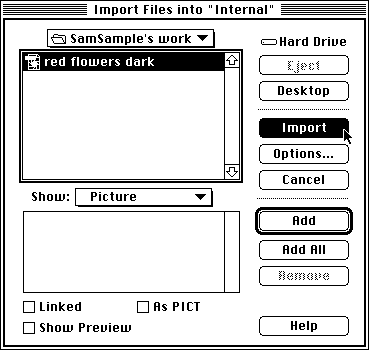
If you want to add pictures from outside sources (e.g., from the scanner) to your animation, use the File-->Import command:
-
Select "Pictures" from the Show pop-up menu, and make sure that "Link To File" is unchecked.
-
Look for the picture file on the disk, and click on its name to select it; then click 'Import'.
-
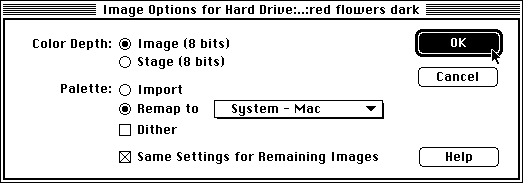
Director may display the Image Options dialog. If it does, choose the lowest of the two Color Depth values displayed (or either one if they are the same); choose 'System - Mac' for 'Remap'. If 'Image' Color Depth is higher than 'Stage' Color Depth, then check 'Dither'. If all of your images have the same color settings, check 'Same Settings...'. Click 'OK'.
-
If any pictures do not show up in the list of files, they were probably not saved in a format that Director understands. You can use Photoshop to open them, then use the Save As command to convert them to PICTs.
-
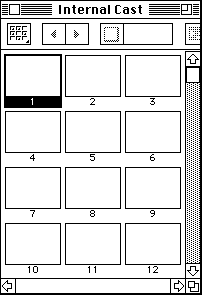
After importing, thumbnails of the images will appear in the Internal Cast window (if necessary, display it using the Cast command in the Window menu). Double-clicking the thumbnail opens the picture in the Paint window, where it can be modified as needed.
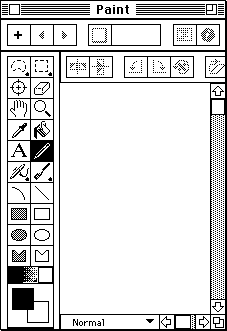
Paint images
-
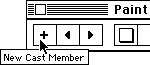
To create new animation images, click on the "+" button at the top-left of the Paint window. This will create a blank new cast member.
-
Use the painting tools in the Paint window's toolbox (similar to the toolbox in Photoshop) to create your picture.
-
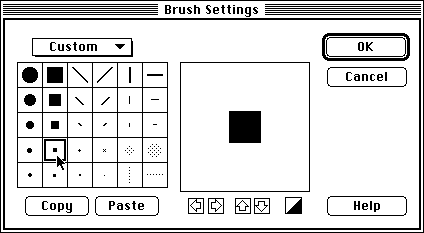
To change type of brush, double-click on the Paintbrush tool in the toolbox to display the Brush Settings dialog.

Pick a new size and shape by double-clicking on your choice in the grid.
-
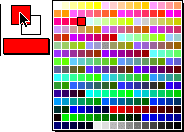
Select the color to paint with by clicking and holding on the foreground color swatch in the toolbox, then sliding the cursor over to select the new color in the palette:
-
If you need to erase everything and start over, double-click the Eraser tool in the toolbox:

-
For pictures representing the various positions of an animation character,
it is helpful to modify a copy of the previous picture rather than start
from scratch each time.
-
In the Internal Cast window, click on the thumbnail of the picture you want
to duplicate.
-
Use the Duplicate command in the Edit menu.
-
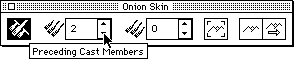
You may also want to see previous and/or following positions as you draw. Display the Onion Skin palette using the View menu, then click on the first button on the left of the palette to turn Onion Skin on. Use the second and third controls from the left to select how many previous/following images you want to see. This only works if your pictures appear sequentially in the Internal Cast window.
Additional Info:
-
While using Director, view its online documentation with the Director Help
command in the Help ('?') menu.
-
The Art Computer Graphics program of Fullerton College offers a class dealing
at great length with Director animations, ACG162-Intro to Multimedia
for Macintosh. Look it up in our Class
Schedules.
Copyright 1997 by Sandro
Corsi. Last modified 9 MAR 97