Exporting HTML from PageMaker
|
ACG Home |
Instructor Home |
Class Home |
list of tutorials |
HTML (Hypertext Markup Language) is a standard notation to describe the structure
of documents. The software (called browser) used to view these documents
will assign a distinctive typographical appearance to each part of their
structure (e.g., level 1 headings will be set large and bold, list items
will be bulleted and indented, etc.) The appearance of the text you are currently
reading is determined by the HTML tags used in its composition.
HTML documents may be distributed in a number of ways (e.g., on a floppy
disk or CD-ROM), but their most popular use in on the World-Wide Web service
of the Internet. When accessed through the Web, each HTML document can be
linked to an unlimited variety of other HTML documents on computers throughout
the world. A link is a word or
words highlighted in the browser (usually by underlining and changing
color). When the user clicks on a link another document, or another
part of the same document, is displayed.
PageMaker creates HTML pages from the text in a publication by matching
standard HTML tags to the styles used in formatting the text. It will also
allow establishing links within the documents and leading to other documents.
Basic operation:
- Use PageMaker to re-open the document containing the text you
formatted with styles in the previous session. Check that all the type for
the web page is in a single text block, and that the styles you used
are only the ones with names starting with "HTML".
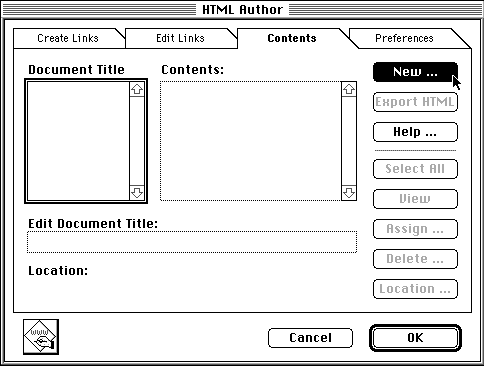
- Use the command Utilities-->PageMaker Plug-ins-->HTML Author to
display the HTML Author dialog box. Click on the tab labeled Contents, then
click New:
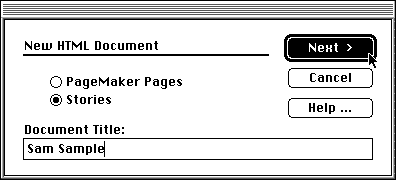
- Click to select Stories (this means that you will choose the text to
be turned into HTML on the basis of the block it's in rather than its page).
Enter your first and last name as the Document Title (this will appear
as the window title in the browser). Click Next.
- In the Unassigned box, click on the story you want to export to
the HTML page (if all is proceeding according to plan, you should only see
one item in this list). Click Add to transfer the story to the Assigned box.
Click Next.

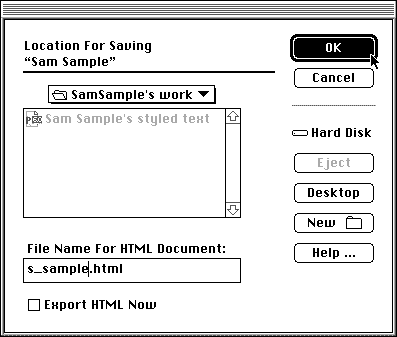
- You are now ready to tell PageMaker how to name your HTML file. This
name must follow whatever rules are set up for the web site, so that
other documents can be linked successfully to your document. For this project,
the name of the document must be your first name's initial, followed by an
underscore (that's shift-hyphen), followed by your last name, followed by
a period, followed by html, all lowercase (e.g., Sam Sample's HTML file is
called s_sample.html). Leave "Export HTML Now" unchecked (we are just getting
set up now, the actual file will be created later). Find your folder on the
desktop, enter the name of the document and click OK to indicate where the
document should be
saved.
- You will be returned to the Contents card. Review the settings to make
sure they are correct, then click OK to return to your publication.
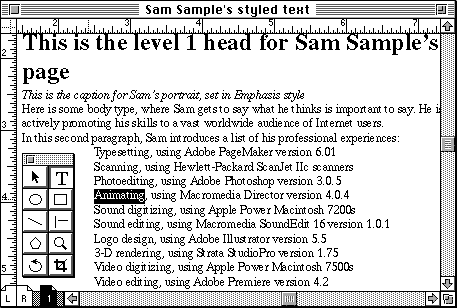
- You can now create links between different parts of your page (e.g.,
from a list of your skills to portfolio samples which demonstrate those skills).
First use the text tool to select the destination of the link (this is the
word or words that viewers will jump to after they activate the
link)
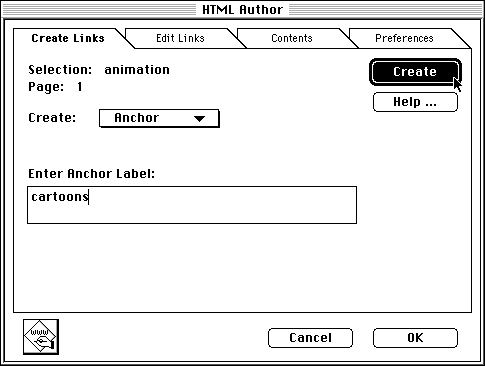
- Use the Utilities-->PageMaker Plug-ins-->HTML Author to display
the HTML Author dialog box. Click on the tab labeled Create Links. Choose
Anchor from the Create pop-up menu. Enter the name of the anchor (a single
word), then click Create. Click OK to exit the
dialog.
- Now use the text tool to select the origin of the link (this is the word
or words that viewers will click on to activate the
link):
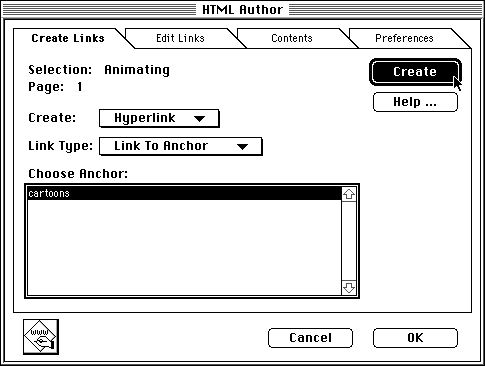
- Use the Utilities-->PageMaker Plug-ins-->HTML Author to display
the HTML Author dialog box. Click on the tab labeled Create Links. Choose
Hyperlink from the Create pop-up menu. Choose Link To Anchor from the
Link Type pop-up menu. In the Choose Anchor box, click on the name of
the anchor you created previously, then click Create. Click OK to exit
the
dialog.
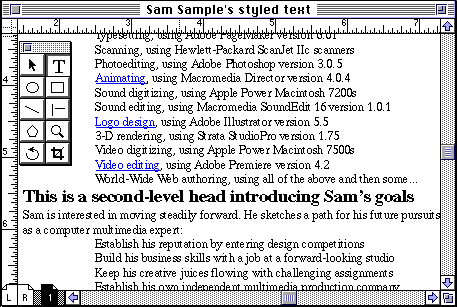
- You should now see your hyperlink displayed as underlined blue text (anchors
are not highlighted in any way). Repeat the process to add any additional
links you deem
necessary.
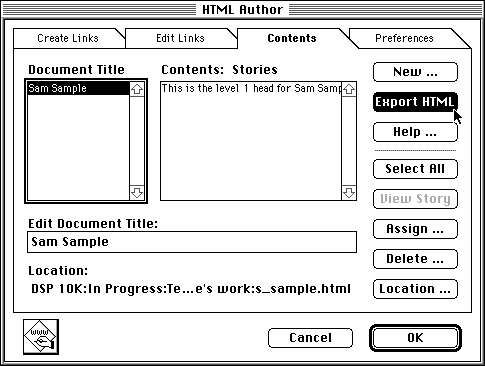
- When you are done adding links, proceed to the actual creation of the
HTML file. Use Utilities-->PageMaker Plug-ins-->HTML Author to display
the HTML Author dialog box. Click on the tab labeled Contents. Click on your
document title (in the box on the left), then click Export HTML. PageMaker
will notify you of the progress of the operation. Click OK when
completed.
- Don't forget to save often as you go. When you are all done, use
File-->Quit to exit PageMaker.
- To test your web page, find the HTML file exported from PageMaker and
drag its icon on the icon of Netscape Navigator. The browser will open and
display a formatted view of your page: click on the links to check that
they work as intended.
Additional Info
- The class to take to learn more about Internet multimedia and interactive
CD-ROMs is ACG164-Multimedia Authoring, offered by the Art
Computer Graphics program of Fullerton College every Fall. Look this class
up in our class schedules.
Last modified 16JUN96 by Sandro Corsi