|
previous tutorial |
ACG home |
Instructor home |
Class home |
List of tutorials |
next tutorial |
Before beginning the project
- If you are working in the ACG Lab
click to read these important notes before you start the tutorial.
This section of the directions contains information that pertains specifically to the way the ACG Lab operates. It may not apply if you work on the project elsewhere.
- If you need to get for yourself the programs mentioned in this tutorial:
- SoundEdit is a commercial program by Macromedia Inc. Macromedia does not intend to further develop this program.
- Director is a commercial program by Macromedia Inc.
- The Shockwave browser plug-in is free software by Macromedia, Inc.
This is the final phase in the creation of an animated element for our web page, saved in the web-compatible Shockwave format (which we discussed in an earlier tutorial). To complete the soundtrack and the animation we will:
For the first step we return to SoundEdit; the following two steps will be done in Director; for the last step we will use a text editing program.
- Re-open your sound file using SoundEdit.
- Adjust the waveform display to better see the parts you are interested in (zoom in/out as needed).
- Click in the waveform display, and drag to highlight the portion of the sound that you want to modify.
- If you had previously labeled the segment you want, just click on its Label and it will be selected again.
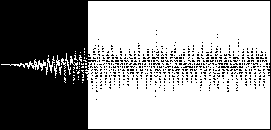
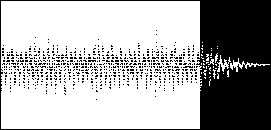
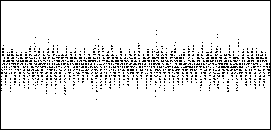
- Once you are satisfied with your selection, apply to it one or more of the commands from the Effects menu to adjust the playback levels (we won't address volume adjustments in Director). As always, make sure that you have a backup of your sound in case you cannot undo an experiment you end up not liking. Below are some examples based on this original waveform:
- Since Director only has two sound channels, more complex sound layering requires prior mixdown in SoundEdit.
- Use Insert-->Track to add new track(s) to the current document.
- Paste sounds in the new track(s)
- With View-->Track Controls checked, sliders will appear above each track to adjust loudness. You will also see left-right pan sliders, but we won't need them--due to filesize constraints our final sounds will not be stereo.
- Combine all tracks into a new mono document with Effects-->Mix.
- SoundEdit also offers a window to simplify matching the ends of sound loops to avoid pops.
- Select the area of the sound that you want to use for a loop.
- Xtras-->Loop Tuner will display a highly magnified view of the endpoints of the selected waveform. Click the arrow buttons until you see a smooth join between the waveforms on the left and right.
- Click 'Set Loop'. This command sets the loopback area to the current selection, so that it will play repeatedly if Control-->Loop is checked.
- If you change your mind, use Modify-->Clear Loopback.
- If instead you like the loop, copy the loopback selection to a new document, and save it so it can be used as a sound loop in Director.
- If de-selected, the loopback area can be selected accurately by clicking one of the two loopback arrow buttons above the waveform.
- When done, make sure all your sounds are saved (as AIFF files), then quit SoundEdit to free up memory.
| return to top |
- Launch Director and re-open your animation file.
- Use the Import command in the File menu to find and open the sounds you have edited. Make sure the file frmat pop-up menu is set to 'All Files' or 'Sounds', otherwise you won't be able to see your files. Make sure the bottom pop-up menu is set to 'Standard Import'.
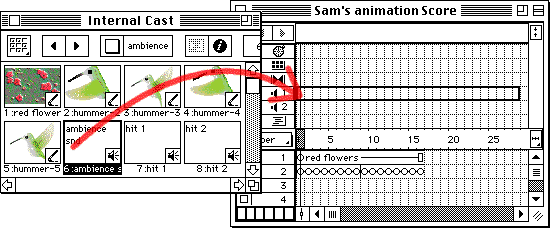
- Display and scroll the Cast window, if necessary, to see the sound cast members that you just imported into your animation file (they will be marked with a loudspeaker icon).
- Click to select the sound that you intend to loop as background ambience. Click the button marked with an 'i' at the top of the Cast window:
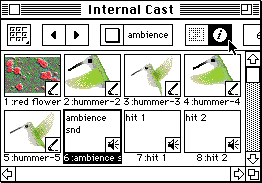
- The Properties Inspector is displayed with the Sound tab selected. Turn on the 'Loop' checkbox--this will force the sound to repeat. You can press the play button (the one with the triangle) in the same inspector to listen to the loop.
- Display the Score window. If necessary, click the Hide/Show button in the right margin to display the Effects Channels. You should see the Sound channels, indicated by loudspeaker icons.
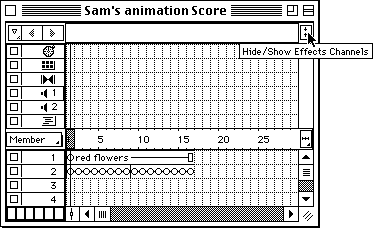
- Drag the looped ambience sound from the cast window to the first frame of sound channel 1 in the Score:
- Adjust the duration of the sound (by dragging its resize handle) to match the duration of the animation.
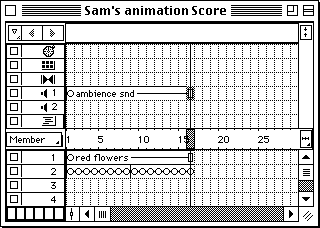
- Drag the hit sound(s) to the appropriate frames in the animation, in sound channel 2 of the Score. Adjust their duration(s).
- Play back the animation. If everything sounds OK, Save the file in preparation for conversion to Shockwave format.
| return to top |
- Make sure your animation is saved (File-->Save). Any further edits to your animation must be made to the original Director file, because the Shockwave file cannot be changed.
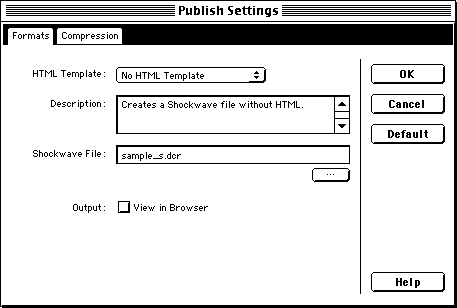
- In the File menu, choose the 'Publish Settings' command.
- In the dialog that appears, click first on the 'Formats' tab. Choose 'No HTML Template' from the 'HTML Template' pop-up menu, and turn off the 'View in Brwser' checkbox.
Then enter the filename (all lowercase) according to the following rules:
- your last name
- followed by an underscore (shift-hyphen)
- followed by your first name's initial
- followed by a period
- followed by
dcr
- as an example, Sam Sample's Shockwave file is called
sample_s.dcr
- Click the 'Compression' tab, and adjust the settings to minimize file size:
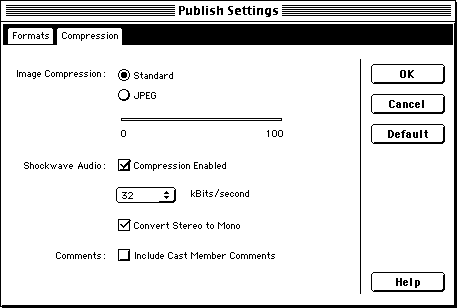
- Assuming that you used 8-bit images, choose 'Standard' image compression (otherwise, you might want to experiment with different levels of JPEG compression).
- Turn on the 'Compression Enabled' checkbox for Audio.
- Choose a low number from the Bit Rate pop-up menu (start with 32, then lower it if your file turns out too big). Low bit rates automatically turn on the 'Convert Stereo to Mono' checkbox.
- Turn off the 'Comment' option.
- Click 'OK' to close the dialog box.
- In the File menu, choose 'Publish'. If you did not save yet, Director will prompt you to do so. It will then proceed to compress your animation and create the DCR file in the same folder as your Director document.
- Before you quit Director, make a note of the size (in pixels) of your animation (see 'Width' and 'Height' in the Modify-->Movie-->Properties inspector).
| return to top |
- Find SimpleText on your computer's hard drive and launch it.
- In the untitled document which appears, create the basic framework of a generic HTML document. Type the following HTML tags, each on a separate line terminated by a return
(the left angle bracket '
<' is shift-comma, the right angle bracket '>' is shift-period):
<HTML>
<HEAD>
</HEAD>
<BODY>
</BODY>
</HTML>
- Press return after the
<HEAD> line to insert a blank line. On the blank line enter the TITLE tag pair:
- a left angle bracket (shift-comma)
- followed by
TITLE
- followed by a right angle bracket (shift-period)
- followed by whatever title you want viewers to see in the titlebar of the browser window
- followed by a left angle bracket (shift-comma)
- followed by
TITLE
- followed by a right angle bracket (shift-period)
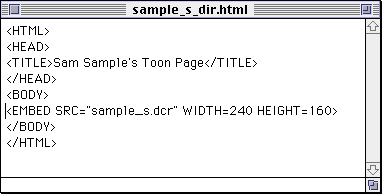
- as an example, Sam Sample's HTML file contains this line:
<TITLE>Sam Sample's Toon Page</TITLE>
- Add a blank line between the two 'BODY' lines and enter the tag to call up the animation:
- a left angle bracket (shift-comma)
- followed by
EMBED SRC=
- followed by the name of your dcr file, enclosed in double quotes
- followed by a space
- followed by
WIDTH=
- followed by the width of your animation in pixels
- followed by a space
- followed by
HEIGHT=
- followed by the height of your animation in pixels
- followed by a right angle bracket (shift-period)
- as an example, Sam Sample's HTML file contains this line:
<EMBED SRC="sample_s.dcr" WIDTH=240 HEIGHT=160>
-
File-->Save. Enter the filename (all lowercase) according to these rules:
- Your last name
- An underscore (Shift-hyphen)
- Your first name's initial
- An underscore (Shift-hyphen)
dir
- A period
- The HTML extension:
html
- as an example, Sam Sample's file would be named:
sample_s_dir.html
and it's contents would look like this:
| return to top |
- Drag the icon of your homepage HTML file and drop it on the icon for SimpleText.
- This is the file with your name and the html extension, originally exported from PageMaker. For instance, Sam Sample's homepage file is called:
sample_s.html
-
After the HTML file opens in a document window, click to place the insertion point where you want your viewers to find the link to the animation.
- Make sure to click outside of existing tags (e.g., not between a '<' and a '>'), and within the BODY container.
-
Enter the tags and the text for the link. Sam Sample typed this:
-
<A HREF="sample_s_dir.html">click to see the Sample Show of sound and animation</A>
- Make sure to substitute the correct filename for your new web page, and the actual text that you want your viewers to click on.
-
Use File-->Save to update the HTML file for your homepage.
- You can then use File-->Quit to exit SimpleText.
- Save your Director and SoundEdit files to your Zip disks--in case you want to make changes later. The DCR file and the two HTML files are ready to be posted on the web server.
| return to top |
Information specific to the ACG Lab
- On ACG Lab computers, the program SoundEdit is on the hard drive, inside the Sound folder. Director is in the Multimedia folder.
- After completing this step of the project, place your web files (the new DCR file, the new HTML file, and the old HTML file with the new edit) in the drop folder on the file server--so they can be posted to the web server by the instructor.
- Help for SoundEdit and Director is available on the file server, in ACG_DOCS.
- The Art Computer Graphics program of Fullerton College offers a class covering the integration of various sound formats into HTML documents, ACG164-Multimedia Authoring, listed in the class schedule.
return
|
previous tutorial |
return to top |
next tutorial |