|
previous tutorial |
ACG home |
Instructor home |
Class home |
List of tutorials |
next tutorial |
Before beginning the project
- HTML (HyperText Markup Language) is the most widely used standard for the creation of hypertext documents. Its name underscores its two most important characteristics:
- Markup Language: a system for describing the structure of documents. It provides code words (called tags) to identify headings, main body, lists, etc. The software (called a browser) used to view HTML documents will assign a distinctive typographical appearance to each structural element (e.g., prominent headings will be set in large and bold type, list items will be bulleted and indented, etc.) The appearance of the text you are currently reading is determined by the HTML tags used in its composition.
- Hypertext: the establishment of connections (called hypertext links) between two documents or parts of documents. When the reader of an HTML document activates a link, the browser program fetches and displays the linked item. HTML documents may be distributed in a number of ways (e.g., on a Zip disk or CD-ROM), but their most popular use is on the World-Wide Web service of the Internet. When accessed through the Web, each HTML document can be linked to an unlimited variety of other HTML documents and multimedia items, on computers throughout the world.
- PageMaker creates HTML pages from the contents of a publication by matching standard HTML tags to the style sheets used to format the type. It also allows establishing links within and between documents. In this session, we will:
- Set up the HTML document (title, filename, and contents)
- Create hypertext links between the table of contents and corresponding sections of the page. A link is made up of:
- A highlighted area which the user of the browser interacts with (generally by clicking on it). This is the origin of the link, called a hyperlink in PageMaker.
- The material (text, pictures, etc.) displayed by the browser when the user clicks on the origin of the link. This is the destination of the link, called an anchor in PageMaker.
- Direct PageMaker to generate a file with the HTML equivalent of the layout. This HTML file is the first draft of your web page, ready to post to a web server.
- Once you have reached this first important project milestone, you may want to spend some time finding out more about HTML and the web.
return to top
- Do the usual preliminary steps:
- Create your work folder on the desktop.
- Copy previous sessions' files from your Zip disk to said folder.
- Eject the Zip disk.
- Use PageMaker to re-open the document containing the text you formatted with styles in the previous session. Check that everything conforms to the previous handouts. In particular, verify that:
- the main heading, table of contents--and introductory paragraph(s), if any--are in a separate text block at the top of the page.
- each section of the web page is in a separate text block following the table of contents.
- the styles you used are only the ones with names starting with "HTML".
- Use the command Utilities-->PageMaker Plug-ins-->HTML Author to display the HTML Author dialog box. Click on the tab labeled 'Contents', then click <New>:
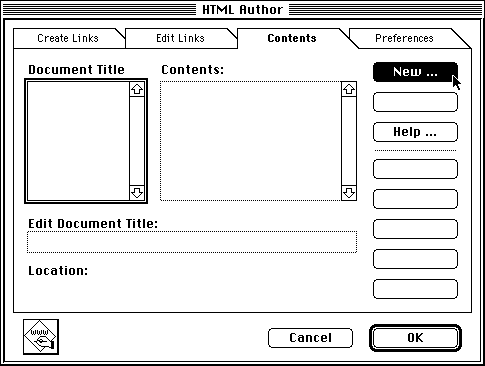
- Click to select 'Pagemaker Pages' (this means that you will choose the text to be turned into HTML on the basis of the page it's in--rather than its text block). Enter a Document Title (this will appear as the window title in most web browsers): it's helpful to include your name and topic, so your page will be indexed more accurately. Click <Next>.

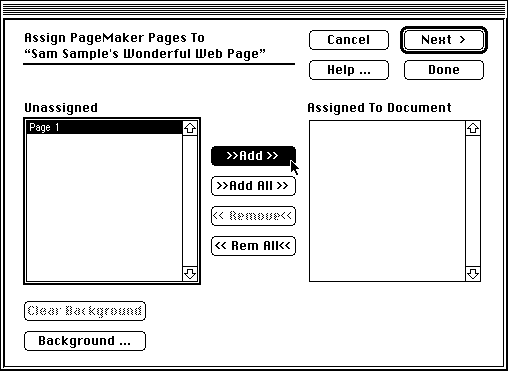
- In the 'Unassigned' box, click on the PageMaker page you want to export to the web page (if all is proceeding according to plan, you should only see one item in this list). Click <Add> to transfer the page to the 'Assigned to Document' box, then click <Next>.
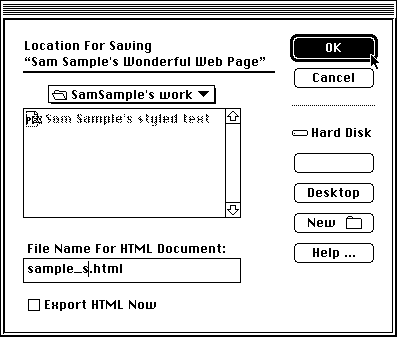
- You are now ready to tell PageMaker how to name your HTML file.
- Find your folder on the desktop. Make sure its name is displayed at the top of the dialog, as the current folder.
- Enter the name of the document file. This filename must follow whatever rules are in effect for the web site, so that other documents can be linked successfully to your document. For this project, the file name for the HTML document must be:
- your last name
- followed by an underscore (that's shift-hyphen)
- followed by your first name's initial
- followed by a period
- followed by html
- The entire filename must be lowercase (e.g., Sam Sample's HTML file is called sample_s.html).
Find out more on naming conventions for the Web (which are largely based on the UNIX operating system) in the filenames section of the UNIX Basics page at http://www.sanedraw.com/LEARN/WEBMEDIA/UNIXSTRT.HTM.
- Leave "Export HTML Now" unchecked (we are just getting set up now, the actual file will be created later).
- Click <OK> to indicate where the document should be saved.
- You will be returned to the 'Contents' card. Review the settings to make sure they are correct, then click <OK> to return to your publication.
return to top
- You can now create links between different parts of your page (e.g., from a line in the table of contents to the corresponding section of the page).
- First use the text tool to select the destination of the link (the word or words shown to viewers after they activate the link): the selection should be within the first line of one of the separate text blocks created in the previous session.

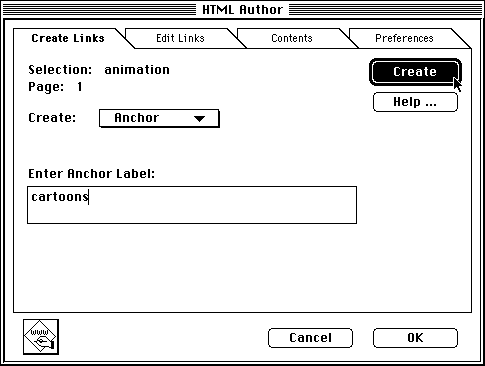
- Use the command Utilities-->PageMaker Plug-ins-->HTML Author to display the HTML Author dialog box. Click on the tab labeled 'Create Links'. Choose 'Anchor' from the 'Create' pop-up menu. Enter the name of the anchor (any single word), then click <Create>. Click <OK> to exit the dialog.
- Now use the text tool to select the origin of the link (this is the word or words in the table of contents that viewers will click to activate the link):
- Use the command Utilities-->PageMaker Plug-ins-->HTML Author to display the HTML Author dialog box. Click on the tab labeled 'Create Links'. Choose 'Hyperlink' from the 'Create' pop-up menu. Choose 'Link To Anchor' from the 'Link Type' pop-up menu (make sure to scroll all the way down to the end of the menu if you don't see this command). The 'Choose Anchor' box will appear: click on the name of the anchor you created previously (if you don't see the anchor listed, make sure to review the previous steps). Finally, click <Create>, then click <OK> to exit the dialog.
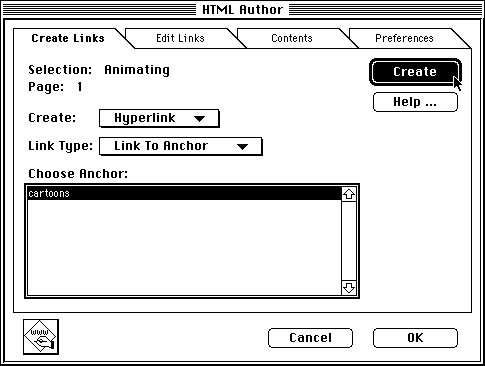
- You should now see your hyperlink displayed as underlined blue text (anchors are not highlighted in any way).

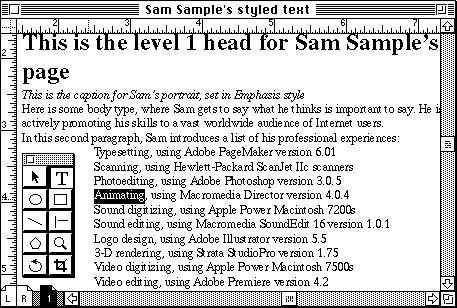
Repeat the process to add any additional links needed to complete your table of contents. Click here to see what the example page looks like with the addition of links.
- You can also create links to other pages on the Internet related to your topic:
- Select the text of the link (e.g., click to read a critic's review of my favourite movie).
- Use the Utilities-->PageMaker Plug-ins-->HTML Author to display the HTML Author dialog box.
- Click on the tab labeled 'Create Links'.
- Choose 'Hyperlink' from the 'Create' pop-up menu.
- Choose http:// from the Link Type pop-up menu.
- In the 'Enter URL' field, complete the address of the page (just as you would enter it in the 'Location' field of a web browser to access the page, e.g. http://www.somesite.com). Find out more on Internet addresses in the URL section of the HTML Basics page at http://www.sanedraw.com/LEARN/WEBMEDIA/HTMSTART.HTM#urls.
- Click <Create>, then Click <OK> to exit the dialog.
- When you are done adding links, you can proceed to the actual creation of the HTML file.
return to top
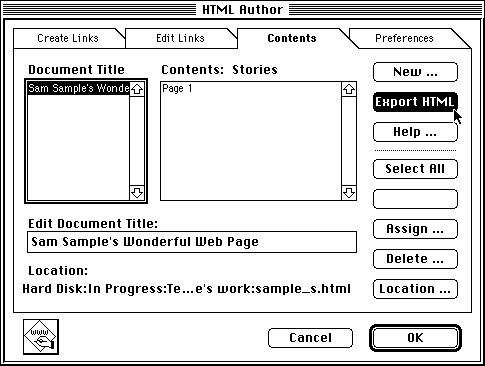
- Use Utilities-->PageMaker Plug-ins-->HTML Author to display the HTML Author dialog box. Click on the tab labeled 'Contents'. Click on your document title (in the box on the left), then click <Export HTML>. PageMaker will notify you of the progress of the operation. Click <OK> when completed.
- To test your web page, open your desktop folder. Drag the icon of the HTML file exported from PageMaker and drop it on the icon of the web browser application. The browser will open and display a formatted view of your page: click on the links to check that they work as intended.
- If you decide to make changes to the web page, return to PageMaker, modify your publication as needed, then repeat the steps to export HTML.
- Also, don't forget to save often as you go. The Export command only saves the HTML version of your work, while File-->Save updates the PageMaker publication file.
- Once you are satisfied with your web page, copy the HTML file to the class drop folder on the file server, where the instructor will find it and post it to the web server.
- When you are all done, use File-->Quit to exit PageMaker and back up both the PageMaker publication and the HTML document.
return to top
- Additional information on the World-Wide Web in general is available from the ACG Web server at acg2.fullcoll.edu/INDX_WEB.HTM.
- A huge number of Internet sites cover HTML and other Web page authoring topics:
- A good starting point is the NCSA Beginner's Guide to HTML at http://archive.ncsa.uiuc.edu/General/Internet/WWW/HTMLPrimer.html (the National Center for Supercomputing Applications is the home of Mosaic, the original graphical web browser).
- For more advanced info and the latest developments, look into the W3 Consortium site at www.w3.org, headed by the Web's inventor, Tim Berners-Lee.
return to top
Information specific to the ACG Lab
- To access the class drop folder on the file server:
- In the Apple menu, select Chooser to display the 'Chooser' window.
- Click on the name of the zone (bottom-left list in the window) that you were told during the lecture.
- Click on the AppleShare icon (top-left), then find and double-click the name of the file server 'ACG' in the list on the right.
- In the next dialog, click <Guest>, then <OK>.
- In the last dialog, make sure 'ACG_FILE' is highlighted, then click <OK>. Close the Chooser window.
- Find and open the 'ACG_FILE' icon on the desktop. Find the folder with the instructor's name, and inside it find the folder for your class.
- Inside the class folder you will find a folder labeled 'Put in Here'. Drag the icon for your HTML file to this folder, then click to proceed in the dialog that will appear. Make sure to drag only your HTML file and no other items.
- As soon as the instructor can copy the HTML file to the Lab's web server, you will be able to access your web page from the roster linked at http://www.sanedraw.com/LEARN/ACG/CURRENT/INDEX.HTM (assuming the file name is correct and the other requirements are met).
NOTE: you can only connect to the server with your files while on campus--the roster links do not work across the Internet.
- To look for web sites related to your topic that you might want to link to:
- In the Apple menu, select Sherlock.
- Click on the 'Search Internet' tab
- Click in the list of search engines to check the ones appropriate to your topic, and uncheck the inappropriate ones.
- Type keyword(s) descriptive of your topic, then click <Search>
- When Sherlock completes the search, it lists the sites it found. Clicking on any one of the sites listed will display a brief description at the bottom of the window. Click on the link within the description to view the site in your web browser program.
- If you like the site, make a note of its address (in the field called 'Location' in Netscape Communicator, 'Address' in Internet Explorer), then link to it in PageMaker (you can use copy-and-paste to avoid typing mistakes).
- Before leaving, make sure to copy your files back to your Zip disks, so you can continue your work in the following session.
- The class to take to learn more about Internet multimedia and interactive CD-ROMs is ACG164-Multimedia Authoring, offered by the Art Computer Graphics program of Fullerton College every Fall. Look it up in the ACG Class Schedule.
return
|
previous tutorial |
return to top |
next tutorial |