|
previous tutorial |
ACG home |
Instructor home |
Class home |
List of tutorials |
next tutorial |
Before beginning the project
- If you are working in the ACG Lab
click to read these important notes before you start the tutorial.
This section of the directions contains information that pertains specifically to the way the ACG Lab operates. It may not apply if you work on the project elsewhere.
- If you need to get for yourself the programs mentioned in this tutorial:
Tutorial Description
Premiere is the most widely used program for Desktop Video--recording and editing for multimedia (CD-ROM, Web) applications. While higher-end programs exist for non-linear video editing for industrial and broadcast applications, Premiere provides the most valuable features at a much lower cost.
In this first session, we'll create the elements for our video:
As in previous occasions, you will find familiar features in this program, helping you to guess function and operation. The Title window has many of the standard facilities of drawing programs like FreeHand. In the following session, we'll also see the Project window, which displays a visual list of the elements to be edited (like the Cast window in Director); and the Timeline window, used to arrange those same elements (similar to the Score window in Director).
- Use Apple-->Control Panels-->Memory
- If you find that Virtual Memory is on, turn it off. After you close the Memory control panel, use the Special-->Restart command in the Finder to reboot the computer.
- If Virtual Memory is already off, simply close the Memory control panel. There is no need to reboot the computer.
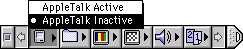
- Turn off AppleTalk to minimize interruptions
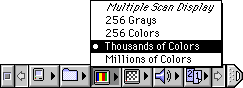
- Switch display to thousands of colors to improve playback speed
- Connect the camera and the microphone to your computer.
- Find the QuickMovie application icon and start the program:

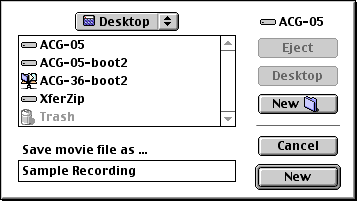
- The program should immediately ask where you want to save your recording. Save the still-empty movie file to your folder on the desktop. This file can be named any way you like. We'll use this recording as raw footage for the final video to be edited in the following session.
- If the Save dialog box does not appear (perhaps because the program was already running) choose New from the File menu. This will bring up a new window where you should see a live feed of the video from the camera hooked up to the computer.
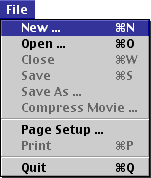
- If at any time you need to re-record, make sure to use File-->New again, so that the new recording won't be appended to the old file.
- Choose the video recording settings. These are not necessarily the best settings for highest-quality results, but they should allow you to fit your video recording in a small file (as long as you keep it short).
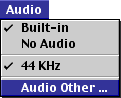
- Next, choose the audio recording settings.
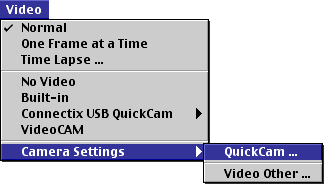
- Use Audio-->Audio Other to bring up the Sound dialog.
The Sound dialog contains three sets of options, displayed in turn by using the pop-up menu in the upper-left corner of the dialog. On the right there is an additional section with a meter to check sound levels.
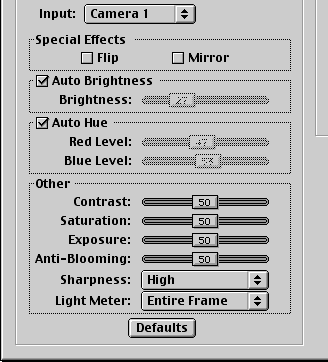
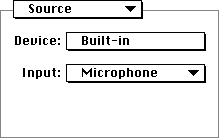
- Choose 'Source' from the pop-up menu. Select the following options: Device = 'Built-In'; Input = 'Microphone' or "External Mic".
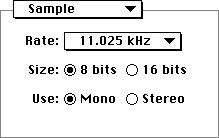
- Choose 'Sample' from the pop-up menu. Select the following options: Size = '8 Bits'; Use = 'Mono'. For Rate, choose the lowest value available (but no less than '11.025 kHz')--some machines won't go lower than '44.100 kHz'.
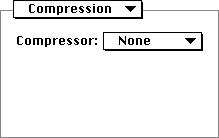
- Choose 'Compression' from the pop-up menu. Select Compressor = 'None'. This is the safest setting at the moment to avoid incompatibilities.
- In the section to the right, select 'Speaker Off While Recording' (this avoids possible feedback noise). With the Volume slider set to 100, speak into the microphone and adjust the Gain slider so that a consistently high number of green bars is visible, avoiding red bars. Remember to speak in the same manner later on, during the actual recording.
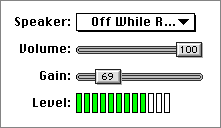
NOTE: The program occasionally resets the gain slider. If sound is not being recorded, come back to this dialog and make sure the gain slider is turned up. Also, make sure to speak close to the microphone.
- Click 'OK' to close the Sound dialog and confirm your settings.
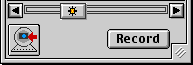
- Rehearse your act, then proceed to record:
- Make sure the program is in Record mode (the button at the lower-left of the preview window shows the QuickCam with a red arrow). Click the 'Record' button when ready.
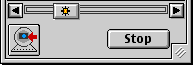
- During recording, motion in the preview window will be choppy--this won't affect the quality of the file, it's just the computer saving its strengths for recording rather than playback. When done (again, keep it short and to the point!) click the Stop button (which replaces 'Record' while recording).
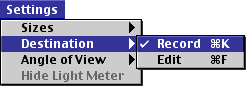
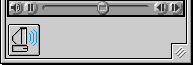
- To check your work, use Settings-->Destination-->Edit to put the program in Playback mode (the button at the lower-left of the preview window shows the monitor emanating blue arcs). Click the Play button (the triangle pointing to the right in the control bar--immediately below the image). Click the same button again (it turns to two vertical bars during playback) to stop.
- Make sure to save your recording, so you can use it in your project during next week's session. You can afterwards quit QuickMovie.
return to top
- Find the Premiere application icon and start the program:

- When the New Project Presets dialog appears, click 'Cancel'.
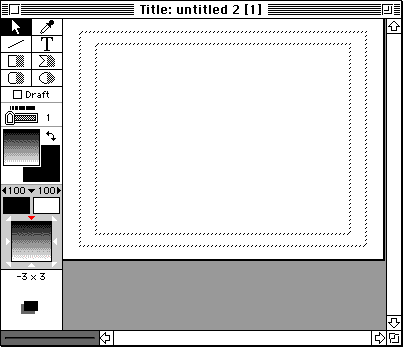
- Use File-->New-->Title to open the Title window.
- This is a drawing program built into Premiere, with features and tools not unlike the ones we saw in other graphics programs (PageMaker, Illustrator, etc.)
- The dotted boxes at the margin of the blank document are the title-safe and action-safe areas, which are only relevant to work done for TV. The boxes will not appear in the final version, however--and they may be useful to help position your title.
- Use Windows-->Title Window Options to bring up the Title Window Options dialog.
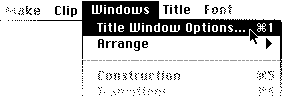
- Uncheck '4:3 Aspect', and fill in the frame size (176 W x 120 H)
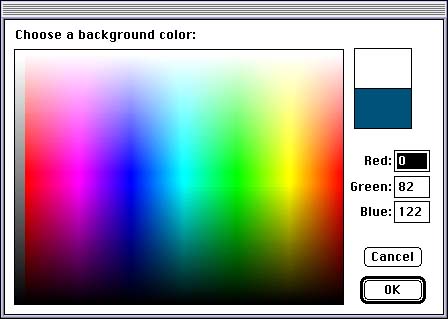
- To choose a different background color, click on the box below 'Background' to bring up a color picker dialog.

- Click on the color you want.
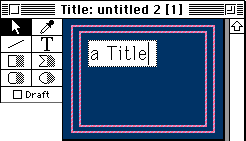
- Now enter and format the text of your title. Remember to make it legible by using uncomplicated typefaces at the largest size possible.
- Choose the Type tool ('T') in the toolbox

- Click anywhere in the document area. A white box and a flashing insertion bar will appear. Start entering text at the keyboard.
- To reposition the title block, click inside it with the Arrow tool, then drag it to a new location.
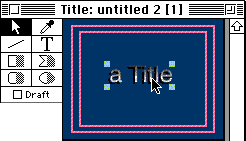
- To resize the title block, click on one of the handles at its edges with the Arrow tool, then drag.

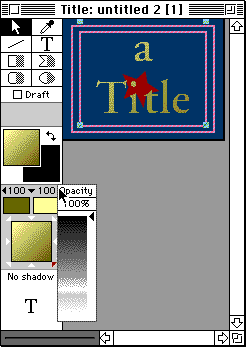
- To format the type, select it and then:
- Use the commands in the first two sections of the Title menu. The formatting commands apply to the highlighted portions of the text.
- Choose new colors in the color picker, brought up by clicking on the color swatches.

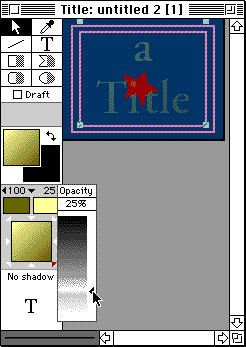
- Change the transparency of the type with the Opacity pop-up sliders.
- Make the type opaque by dragging the slider up.
- Make the type see-through by dragging the slider down.
- Change gradient direction by clicking on one of the arrowheads surrounding the gradient preview.
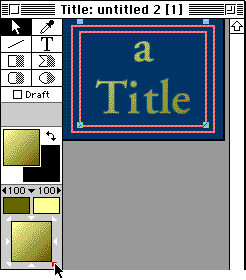
- Modify the drop shadow by dragging on the shadow preview ('T' at the bottom of the toolbox).
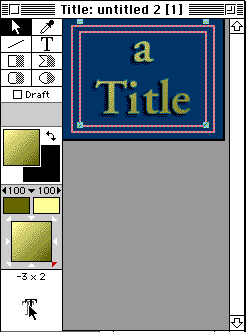
- You can also change the settings in the Title-->Shadow submenu.
- A drop shadow is often helpful to increase the separation between the background and the type.
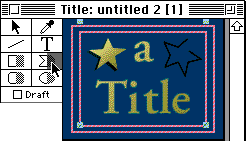
- Optionally, you can explore the simple drawing tools available in the Toolbox to add other elements to the title card besides type.
- The Polygon tool can be used to crate arbitrary shapes with straight edges. The shaded right half of the tool icon in the toolbox lets you draw filled shapes; the left half is for drawing the outline of the shape only.
- While the Title window is still active (in front of other windows), use File-->Save to save your work to a Premiere Title file. Also this file will be used in your project during next week's session.
- Close the Title window and quit Premiere.
return to top
Notes
- Virtual Memory (VM) means that the computer will use space on the hard drive to supplement available memory. This allows you to, for instance, run more programs at once--without purchasing relatively expensive memory components.
- Since disks are substantially slower than actual memory, VM should be off for time-sensitive tasks like video playback.
return
Information specific to the ACG Lab
On ACG Lab computers, the programs Premiere and QuickMovie are on the hard drive, inside the Video folder.
The QuickCam camera and the PlainTalk microphone are available for checkout from the lab aide. To set them up:
- Use Apple-->Control Panels-->Extensions Manager
- Choose '9.0.4 Base ACG' from the Selected Set menu. After you close the Extensions Manager control panel, use the Special-->Restart command in the Finder to reboot the computer.
- If '9.0.4 Base ACG' is already selected, simply close the Extensions Manager control panel. There is no need to reboot the computer.
- Plug the PlainTalk microphone into the port on the back of the computer marked with a microphone symbol.
- Plug the camera's cable into the available USB port on the back of the computer--marked with this symbol:

- Adjust the position of the camera on its base to frame the subject.
- Rotate the barrel of the camera lens to focus.
- Look for better illumination if available (this improves contrast and overall image quality).
Documentation on Premiere is available on the 'ACG' lab file server, in the 'ACG_DOCS' volume.
The Art Computer Graphics program of Fullerton College offers a class covering video in detail, ACG66: Multimedia Video. Look it up in our class schedules.
return
|
previous tutorial |
return to top |
next tutorial |