Computer Graphics Survey
Rendering a 3D Scene
Using Art*lantis 3.0 on MacOS Computers
| previous handout |
ACG Home |
Instructor Home |
Class Home |
list of tutorials |
this is the last handout |
Before beginning the project
Read the
information that pertains specifically to the way the ACG Lab operates.
This section of the directions may not apply if you work on the project elsewhere.
- To complete the 3D portion of our web page you will first return to MiniCAD to export the model as an Art*lantis file.
- While MiniCAD is capable of basic renderings, for more complex images you need to use a separate, dedicated renderer called Art*lantis.
- In Art*lantis, open and set up the file exported from MiniCAD.
- Choose the rendering attributes for the scene.
- Render a thumbnail image of the model.
- Render an interactive QuickTime VR panorama of the inside of the room.
- Edit the homepage HTML file to add a link to the QuickTime VR file, using SimpleText.
- Re-open the 3D logo file created in the previous session, using MiniCAD.
- Make sure the commands needed to export to Art*lantis are available, by using File-->Overlays-->Art*lantis MC7 (this may change aspects of the user interface).
- Convert the 3D primitives, so that they will be rendered correctly:
- Use the pointer tool to select the roof; Model-->Convert to 3D Polys
- Use the pointer tool to select the room; Model-->Convert to Mesh
- Indicate the parts of the model that use different materials by color-coding them:
- Use the pointer tool to select one of the parts of the model (for instance, the roof)
- Use View-->Art*lantis-->Material to display the 'Assign Material' dialog
- Click 'New' to open the 'Edit Material' dialog, enter a name (such as 'roof'), and choose a color from the pop-up palette (these colors help to tell apart the various objects, they will not necessarily show in the final rendering).

- Click 'OK' to return to the 'Assign Material' dialog, click 'OK' again to return to your model.
- Repeat the same process to color-code all the other parts of the model.
- If the colors you chose are not displayed in the model window, try to select a solid rendering mode (in View-->Rendering) to ask the program to re-render everything.
- Export the color-coded model as an Art*lantis file
- Make sure to save the MiniCAD file, in case you want to make changes to the scene (File-->Save).
- Use View-->Art*lantis-->Art*lantis Export to display the 'Art*lantis Export' dialog.

- Uncheck 'Replace Art*lantis Lights'
- Check 'Export all visible objects'
- Check 'Standard (fast)' mode
- Check 'New File' mode
- Click 'OK'
- When asked, enter any filename (this file will not be placed on the web server), but keep the default '.opt' extension.
- Note that two files will be created, one with the filename extension '.opt' and the other with extension '.db'. Make sure to keep both files in the same folder at all times.
- You can now quit MiniCAD to free up memory.
| return to top |
- Launch the Art*lantis program.
- File-->Preferences. Choose settings that will speed up the operation of the program and conserve memory:
- Choose a medium size for the preview window.
- Choose a medium # of refractions, and 1 reflection.
- Click the 'Select' button to find and choose the 'Shaders' folder in the same folder as Art*lantis.
- Choose the leftmost tesselation button (for a lower polygon count).
- File-->Open; choose 'OPT/DB' from the pop-up menu at the bottom of the dialog box; find and double-click the '.opt' exported from MiniCAD.
- As you work, render the scene whenever you need to check effects not displayed in the modeling window. Use the Render command in the Render menu.
| return to top |
- Use Windows-->Edit Fixed Cameras to display the 'Fixed Camera' window.
- Click the 'axis' button to display the camera placement window.

- Drag the camera symbol (a light blue box) to reposition it--the preview window will update to the new viewpoint.
- Drag the look-at symbol (the arrowhead) to reposition it--the preview window will update to the new camera direction.
- For different views of the camera location diagram, click on the sides of the cube icon at the bottom of the window.
- Use the hand and magnifier tools (icons at the bottom of the window) to focus on different areas of the model space.
- When done, close the 'Fixed Camera' window.
| return to top |
- Make sure Windows-->Edit Shaders is checked. This displays a window with the same name as one of the materials you entered while color-coding the parts of the model in MiniCAD.
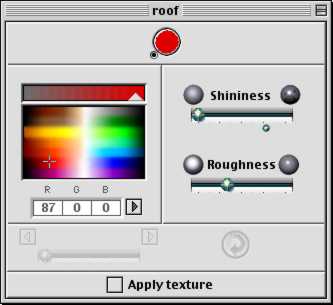
- Use Windows-->Display Materials List to see a window allowing you to select any of the materials in the model for modification.
- Use Windows-->Library to display a window with the material shaders that come with the program.
- To see thumbnails of additional textures, use the pop-up menu and the arrow buttons at the bottom of the Library window.
- When you see a shader you like, drag its icon and drop it on the name of a material in the 'Materials List' window.
- You can use additional controls (in the window with the same name as the material) to customize the shader. For instance, the image details in some shaders can be scaled.
- Use Render-->Render to see a clearer picture of the textures you applied.
| return to top |
- Display the Lights palette (Windows-->Edit Lights).
- To better see the effect of lighting changes in the preview window, you may want to have Options-->Cast Shadows checked.
- NOTE: the renderings will only show the illumination cast by the lights. The lights themselves are invisible.
- Change the orientation and settings of the default light
- Click the 'axis' button to display the light placement window.
- Drag the camera symbol (a starburst) to reposition it--the preview window will update to the new illumination.
- The other controls in the light placement window are the same as in the camera placement window.
- In the Lights palette, click on the color picker to choose the light's color.
- Just above the color picker is the intensity slider--drag it to adjust the brightness of the light.

- Create and adjust a new light. This can be used to light the inside of the room, so details of your logo are more visible.
- In the Lights palette, click on the 'Create' button to add an new entry to the list of lights.
- Choose the light type by clicking on the lightbulb button.
- Use the the light placement window to drag the new light inside the room. Make sure to check the position of the light from multiple views.
- Use the other commands in the Lights palette to adjust the color, intensity and radii of the new light.
- Again use Render-->Render for a more accurate view of the effect of your lighting settings.
| return to top |
- Bring up the Background palette using Windows-->Edit Backgrounds. This lets you add a backdrop to the rendering.
- Choose one of three color options: Uniform, Graduated, Graduated Line.
- Click the buttons at the top of the palette to select each of the color(s) used in the background. Use the color picker and the intensity slider to adjust the selected color.
- Bring up the Atmosphere palette using Windows-->Edit Atmosphere. This lets you add effects such as haze or mist. Beware of overly dense fogs which may obscure your scene completely.
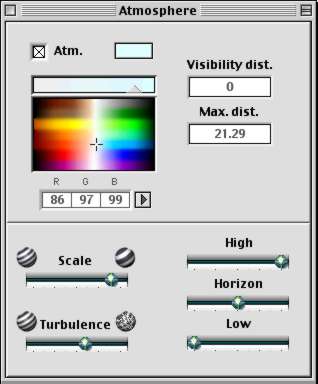
- Turn the fog on and off with the 'Atm.' checkbox
- Use the color picker and the intensity slider to adjust the color of the fog.
- Use the three sliders at the bottom-right (High, Horizon, Low) to change the fog density at different heights above the ground.
- Use the Scale and Turbulence sliders to change the detail appearance of the fog.
| return to top |
This picture will be used as a thumbnail for the link from your web page
to your 3D panorama file
- Use Render-->Render Fixed Cameras to display the rendering dialog.
- Enter the filename (all lowercase) according to these rules:
- Your last name
- An underscore
- Your first name's initial
- Another underscore
- logo
- A period
- JPEG image file extension: jpg
- Sam Sample's file would be named sample_s_logo.jpg
- Choose 'JPEG' from the 'Doc Format' pop-up menu.
- Enter width and height (in pixels), in the appropriate fields. To keep download times short, keep the size small (320 x 240, for instance).
- Choose the other settings as shown in the picture below:
- Click 'Render'.
- A rendering window will open, and the rendered image will gradually appear. This rendering will take a bit longer, since there are many more computations involved.
- By default, the JPEG file with the rendered image will be automatically saved to the same folder as your Art*lantis document. Check that everything looks OK, then close the rendering window.
| return to top |
- Use Windows-->Edit VR Panoramas to display the 'Panoramas' window.
- Click the 'axis' button to display the camera placement window.
- Drag the camera symbol (a light blue box surrounded by a circle) to reposition it inside the room.
- The other controls are the same as in the fixed camera placement window. Make sure to check the position of the camera from multiple views.
- Click the camera button in the 'Panoramas' window to display the rendering dialog.
- Enter the filename (all lowercase) according to these rules:
- Your last name
- An underscore
- Your first name's initial
- Another underscore
- logo
- A period
- QuickTime file extension: mov
- Sam Sample's file would be named sample_s_logo.mov
- Choose 'QuickTime VR 2.0 Compressed' from the 'Doc Format' pop-up menu.
- Choose '160 x 120 test' from the 'Image Size' pop-up menu (this will automatically set the width and height fields as well).
- To keep download times short, choose the smallest size from the 'Resolution' pop-up menu, 'Low (1248 x 384)'.
- Choose the other settings as shown in the picture below:
- Click 'Render'.
- A rendering window will open, and the rendered image will gradually appear. It will then be converted automatically to QuickTime VR format.
- By default, the .mov file with the rendered image will be automatically saved to the same folder as your Art*lantis document. You can test it by opening it with QuickTime Player.
| return to top |
- Make sure the QuickTime VR file exported by Art*lantis (called 'yourname_logo.mov) is in the exact same folder as your other files for the web.
- Drag the icon of your homepage file (called 'yourname.html') and drop it on SimpleText
- Click to place the insertion point where you would like to see the thumbnail linked to your QuickTime VR logo scene.
- As always, make sure that the insertion point is not within a portion of text enclosed in angle brackets ('<' and '>'), and that it is within the 'BODY' container (after <BODY> and before </BODY>).
- Enter the tag to display the thumbnail:
- <IMG SRC="YourJpegFileNameGoesHere">
- Before the IMG tag, enter the start tag for the link to your QuickTime VR file:
- <A HREF="YourMovFileNameGoesHere">
- After the IMG tag, enter the end tag for the link:
- After following all of the above instructions, Sam Sample's HTML file would contain this entry:
- Click on the picture to see a 3D panorama:<P>
<A HREF="sample_s_logo.mov"><IMG SRC="sample_s_logo.jpg"></A>
To see the QuickTime VR file, you and the visitors to your web page will need a browser configured with the same QuickTime plug-in needed to play your video clip.
Before leaving, make sure you drop off your new .jpeg and .mov files, and the edited
HTML, for posting to the web server.
| return to top |
Information specific to the ACG Lab
- Both the MiniCAD and Art*lantis applications are in the CAD folder on the startup drive.
- The QuickTime Player application is in the Video folder on the startup drive.
- Look up in the class schedule
the Art Computer Graphics classes covering 3D topics, ACG120: 3D
Computer Graphics for Macintosh and ACG150: 3D Computer
Animation for Macintosh.
return
| previous handout |
return to top |
this is the last handout |
|
This document originally at <http://acg2.fullcoll.edu/FACULTY/CORSI/LEARN/OVERVIEW/OV160/MAC0EN_P.HTM>
|
|
Copyright 1997-2000 by Sandro Corsi.
Last modified 2000-05-10.
|
SaneDraw home
|