| return to top |
Setting Up for Work
- The scanners can only be used from the computers directly attached to them (they are not available through the network). Bring your Zip disk along and prepare the scanner if not already set-up.
- Make sure that the scanner is powered up. You should see a green light on the front of the unit.
- Turn on the Macintosh connected to the scanner.
- Place your image face-down on the glass plate of the scanner.
- Launch the scanner software, VistaScan.

- The VistaScan window appears, with a preview area on the left and scanning controls on the right. Click the Preferences button in the upper-right corner of the window.

- Click on the 'General' tab. Make sure 'Show Ruler' is checked.
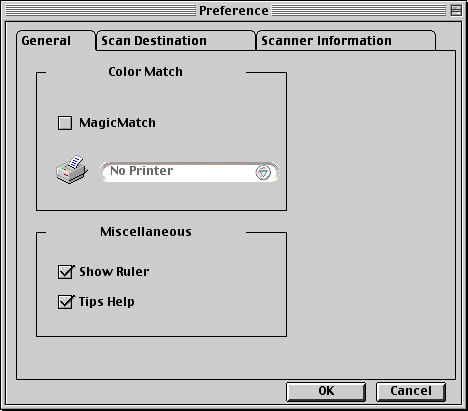
- Click on the 'Scan Destination' tab. Choose 'TIFF' file format and 'File' destination (the disk icon).

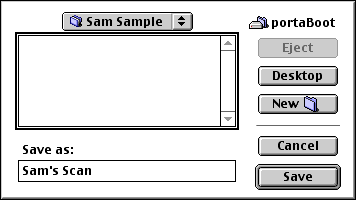
- Click <Setting>. Locate your folder on the desktop as the destination of the scanned image file. Enter your choice of filename, then click <Save>
- Click <OK> to exit the Preferences dialog.
- Click on the 'General' tab. Make sure 'Show Ruler' is checked.
| return to top |
Preview and Adjust the Image
- Click the 'Advanced' button at the top of the window. This lets you control directly the image settings.
- Make sure that 'Flatbed (Reflective)' is selected in the top pop-up menu on the right.
- Click the 'Preview' button on the right of the window. VistaScan will activate the scanner and display a reduced view of your image.
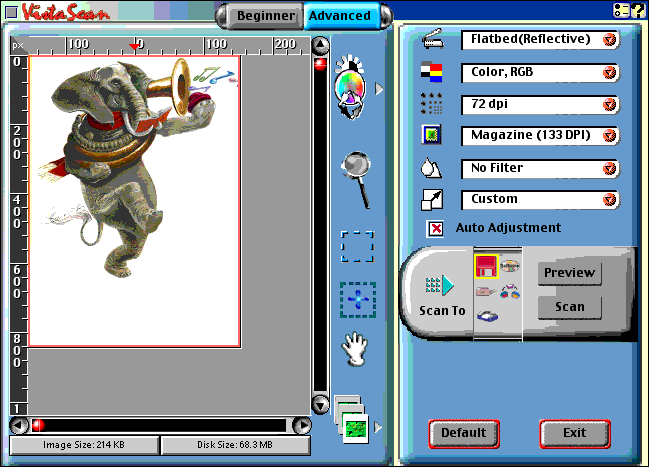
- Using the second pop-up menu, set the image type.
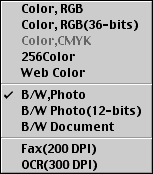
- 'Color, RGB': use for any color image with smooth changes in value, hue, saturation, such as color photographs, pastel drawings, etc. VistaScan will record the full range of colors the scanner is capable of detecting, yielding a large file, good for higher-quality printing and screen display. Photoshop "RGB Color" mode.
- 'B/W, Photo': use for any monochrome image, such as black & white photographs, pencil drawings, etc. Photoshop "Grayscale" mode.
- Using the third pop-up menu, set the resolution to 72 dpi.
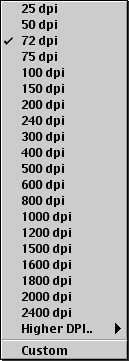
- This is the nominal monitor resolution, for images that will be displeyed on the computer screen (like our web pages).
- Use the fourth pop-up menu to match the source of your image.
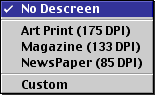
- Descreening is needed to avoid artifacts (called moire patterns) when the original image is halftoned (meaning that color values are simulated by a pattern of dots, as in magazine pictures).
- If the image is not halftoned (original photograph or drawing), turn descreening off.
- Turn off sharpening by setting the fifth pop-up menu to 'No Filter'.
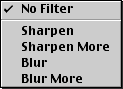
- Sharpening can be applied in Photoshop as well. Saving it for later allows you to retain more of the image quality while editing.
- If necessary, adjust the selected area in the preview window using the Frame tool.

- Click and hold on the sides or corners of the selection, drag them to desired position.
- For a more detailed preview, click the image with the Magnifier tool. Option-click with the Magnifier tool to zoom out.

- Scale the image to the appropriate size in pixels:
- If necessary, change the measurement unit to pixels by clicking the intersection of the rulers (upper-left corner of the window) until it shows 'px'.

- If necessary, display the width and height of the selection by clicking the 'Image Size' button (lower-left corner of the window).

- Use the scaling pop-up menu (the last one) to adjust the size of the scanned image.
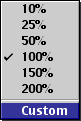
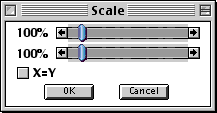
- If you choose 'Custom' from the menu, a separate window appears, with sliders to adjust the scale ratio continuously. To avoid distortions, turn on the 'X=Y' checkbox ensuring proportional scaling.
- If you choose 'Custom' from the menu, a separate window appears, with sliders to adjust the scale ratio continuously. To avoid distortions, turn on the 'X=Y' checkbox ensuring proportional scaling.
- For the image to fit in a web browser on smaller screens, do not exceed approx. 550 x 350 size.
- If necessary, change the measurement unit to pixels by clicking the intersection of the rulers (upper-left corner of the window) until it shows 'px'.
- Make sure the Auto Adjustment checkbox is checked. This re-adjusts the exposure automatically based on your selection.
| return to top |
Scan and Save the Image
- Click the 'Scan' button to acquire the image with the desired settings.

- Find the file you just scanned in your folder, and drag its icon to your Zip disk.

- Return to your computer to let the next person scan.
- To see the image you scanned, drag its icon and drop it on the icon of the program Photoshop.
| return to top |
Notes
Evaluating scanners
- The main features to examine when evaluating a scanner are
- Bit depth
- As described fyrther down in this handout, this determines the number of colors that the scanner can discriminate.
- Currently, most scanners are capable of 30 and more bits-per-pixel, which allows the storage of a very wide range of tone values.
- The actual extent of shadows and highlights captured is determined largely by the quality of the sensor employed. This is expressed as the DMax number: values of 3.5 and higher are recommended.
- Resolution
- This determines the amount of detail that the scanner can 'see' in the image.
- Most current scanners far exceed the resolution needed for actual-size output--generally, 300 dots per inch (DPI) or less.
- The resolution of the lower-end scanners may be inadequate when the image needs to be magnified substantially--as is the case with most slides and negatives.
- When reading scanner specs, look fr the device's actual (or 'optical') resolution. A second, much higher number is often quoted ('interpolated' resolution), which in the vast majority of cases is useless.
- Bit depth
- Type of connection
- High-resolution color images yield large amounts of data. It is desirable, then, to have a fast connection between the scanner and the computer.
- The fastest connection that is readily available is the Small Computer Standard Interface (SCSI). A close contender, as yet not widely available, is FireWire.
- Universal Serial Bus (USB) and Parallel Port connections, while adequate for low-resolution work, are substantially slower
- An significant convenience feature is 'hot-swapping' (being able to safely connect and disconnect devices without turning them off first). Both USB and FireWire offer this feature.
- High-resolution color images yield large amounts of data. It is desirable, then, to have a fast connection between the scanner and the computer.
- Optional attachments
- To work with slides and negatives, a flatbed scanner requires a 'transparency attachment'--often sold as an extra-cost item.
- To scan large quantities of loose-leaf material, a 'sheet feeder' will be useful.
| return |
Color-space models
- Colors are often organized in color-space models to allow precise description and handling. There are two basic types of such models: the ones classified according to the primary colors they use, and the ones that conform more closely to human perception.
- Primary-colors models are in turn divided into subtractive colors and additive colors.
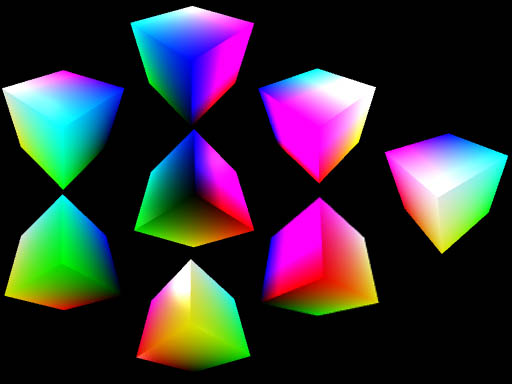
This picture shows 8 views of a color cube model, each centered on one of the color corners: Black is in the center, surrounded by the RGB primaries and their secondaries (which are, in turn, the CMY primaries). To the side is the opposite side of the cube, showing the White corner.- Additive colors (RGB)
- Called additive because higher values of the primaries in a color mix add more light, yielding a lighter color.
- Applies to images on displays emitting light, such as computer and video screens.
- The additive primaries are Red, Green, and Blue (forming the acronym RGB), and determine the color of the phosphors used in monitors.
- Subtractive colors (CMYK)
- Called subtractive because higher values of the primaries in a color mix subtract light, yielding a darker color.
- Applies to images which do not emit light, and can only be seen when illuminated by an outside light source.
- The subtractive primaries are Cyan, Magenta, and Yellow. To these, to compensate for the imperfections of pigments, is usually added a fourth color, Black. The model is therefore also known as CMYK, and determines the colors of the inks used in process (= full-color) printing.
- Additive colors (RGB)
- Perceptual models
- Models based on human percepion try to account for our subjective understanding of color. There are at least two versions, Hue Saturation Luminance (HSL), and Hue Saturation Value (HSV), but we can ignore the differences among them for this discussion.
- Hue indicates the place in the color "rainbow" (Purple vs. Yellow vs. Green, etc.)
- Saturation indicates the distance from neutral gray (also: the amount of complementary hue mixed to the color)
- Luminance, or Value (or brightness) indicates the amount of light emitted (or reflected) by the color.
- Models based on human percepion try to account for our subjective understanding of color. There are at least two versions, Hue Saturation Luminance (HSL), and Hue Saturation Value (HSV), but we can ignore the differences among them for this discussion.
| return |
Color on computers
- A computer screen is better understood through the RGB model: if you look closely at a color TV or monitor you will see that all colors are made up of tiny red, green, and blue dots or stripes.
- The same three colors are used also in Liquid Crystal Displays (LCD)--even though the individual color components are not visible.
- The number of bits per pixel (amount of memory) determines the number of colors that can be shown. The added twist is that there are two ways that you can use the bits assigned to each pixel.
- Systems with 8 bits per pixel (or less) use a two-step process to choose different sets of colors based on the requirements of the image shown. An 8 bit-per-pixel video card offers a choice of up to 256 different colors at once. The palette itself, however, can contain more than 256 colors -- in most cases, over 16 million. This arrangement, called indexed color or color mapping, involves:
- Use all bits to come up with a single number, used as index into a color palette, or Color Look-Up Table (CLUT)
- Index number leads to a pigeonhole in the palette
- Actual color 'recipe' is in the pigeonhole
- Use all bits to come up with a single number, used as index into a color palette, or Color Look-Up Table (CLUT)
- Systems beyond 8 bits can display enough simultaneous colors to dispense with the color mapping mechanism. In a 24 bit display, for instance, close to 17 million colors are available, resulting in a true-color image. This arrangement, called direct color, involves:
- Divide available bits among 3 primaries
- The 3 numbers themselves are the 'recipe' for the pixel's color
- For exanple, starting with 24 bits, 8 bits each will be assigned to R, G, and B -- allowing 256 different intensity levels for each one. A pixel with values R=255, B=255, G=255 will appear white. An R=0, B=0, G=0 pixel will appear black.
- Divide available bits among 3 primaries
- Systems with 8 bits per pixel (or less) use a two-step process to choose different sets of colors based on the requirements of the image shown. An 8 bit-per-pixel video card offers a choice of up to 256 different colors at once. The palette itself, however, can contain more than 256 colors -- in most cases, over 16 million. This arrangement, called indexed color or color mapping, involves:
- Computer printers are built around the CMYK model, as traditional printing presses are.
- Number of colors printed
- Depends on amount of information received from the computer
- Depends on print engine capabilities
- Range of ink or toner colors
- Size of printer dots relative to halftone screen frequency
- Number of colors printed
| return |
Raster File Formats
- Raster files are the ones that store an image as a grid of colored dots called pixels (picture elements).
- Raster images are generally susbstantially larger than typical text files. Before posting on the web, we will want to reduce the file size in various ways, including:
- Color reduction
- Throwing out part of the color information, retaining only the most significant values.
- The result will be a color-mapped file (see the discussion of computer color above).
- Lossy file compression
- This involves throwing out both color and detail information, preserving the basic appearance of the image.
- Lossy compression schemes allow adjusting the trade-off between file size and image quality.
- Color reduction
- Since both color reduction and lossy compression involve a degradation of the image, they are not suitable for intermediate files. We want to have a pristine copy of the image to work on. Only after we are done making changes will we concern ourselves with shrinking the size of the file.
- VistaScan can save to several raster file formats that will preserve all the image information, such as:
- TIFF (Tagged-image File Format): this is the most suitable format if you were to use this file on non-Macintosh computers as well.
- Pict: this is the most widely used graphics format for Macintosh programs. Choosing this format will later on allow you to re-use the same image in your animation--if you wished to do so.
| return |
Information specific to the ACG Lab
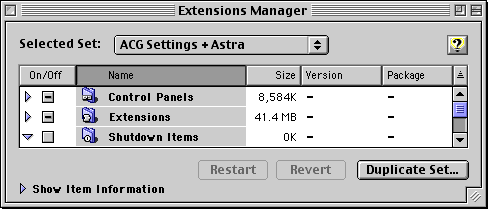
- If the scanner software refuses to work, use Apple-->Control Panels-->Extensions Manager. In the Extensions Manager window, choose 'ACG Settings + Astra' from the 'Selected Set' pop-up menu. Close the Extensions Manager window. Use Special-->Restart to reboot the computer.
- In ACG lab computers, the program VistaScan is on the startup drive, in the Utilities folder.
- In ACG lab computers, the program Photoshop is on the startup drive, in the Paint folder.
- You will find a thorough description of many issues concerning color, both on and off the computer, in the "Interactive Color" presentation created by the San Diego Supercomputer Center. A copy is available in the instructor's folder on ACG_FILE.
- Most classes in the Art Computer Graphics program of Fullerton College deal at least briefly with scanners. For in-depth instruction, look to the classes ACG132-Electronic Paint, and ACG146-Desktop Publishing II. Find these classes in our class schedule.
| return |
| previous handout | return to top | next handout |
| This document originally at <http://acg2.fullcoll.edu/FACULTY/CORSI/LEARN/OVERVIEW/OV050/MAC1EN_P.HTM> | |
| Copyright 1996-2000 by Sandro Corsi. Last modified 2000-02-16. | SaneDraw home |