Puzzle Project: Game Logic Using Object-Oriented Scripting
|
ACG home |
SaneDraw home |
Instructor home |
learning resources home |
class home |
handouts index |
Outline of the steps in the second phase
of the project
After completing the layout of the graphic elements in
the previous session, we need to add the scripts that allow the
player to interact with the game pieces.
Find and
re-open the Director movie
with your puzzle.
Add a cast member
for the "missing" gamepiece
using the shape tools.
- This cast member will be invisible, allowing the backdrop of the
gameboard to show through. A sprite based on this cast member, however,
will still be able to receive mouse events when clicked.
- The game animation will be based on switching the cast members assigned
to the sprites on the gameboard, while the sprites themselves retain their
locations. Assigning this invisible member to a sprite causes the game
piece at that location to appear to have moved away.
Make
the registration point of
the bitmap cast
members the same as for the shape member.
- When setting the position of a sprite, we are actually setting the
position of the cast member's registration point. If the registration point
is not placed consistently, sprites with the same location property will
appear offset.
- Shape cast members' registration point is always the upper-left corner
of the shape, and cannot be changed. The registration point of bitmap cast
members can be adjusted: to keep everything consistent, we need to place
the bitmaps' registration point at the upper-left corner of the game piece
picture.
Make
the elements of the game
respond to user clicks.
- A sprite will not receive mouse events unless it is "active". Sprites
can be activated by either:
- Entering valid statements in their script (a comment suffices)
or
- Marking the sprite as "Editable" in the score window.
- You can choose either approach. This handout lists the steps necessary
for the latter method.
Provide
visual feedback to the
user when a click on a game piece occurs.
- A properly designed user interface provides immediate feedback so
the users will know that their input has been received. There are
well-established sequences of responses for basic mouse interaction, and
in Director these are handled automatically when a cast member is marked
to highlight.
- The visual response provided is of one kind only (the colors of the cast
member are inverted). Authors can create animations to provide more complex
response--but then they also have to program from scratch the interaction
logic.
Create
a movie script with a
handler that initializes
the
objects used during the game.
- Since we want this part of the program to execute whenever the game
is opened, we need to handle the startMovie message, which in turn requires
that we enter the handler in a movie script.
- First, the handler will declare the movie's global variables.
Some store the location of various elements so they can be modified as the
game progresses. The others store the basic dimensions of the game (such
as the total number of squares), so that a different-size game can be easily
created by changing only a few values.
- Variables are named containers you create to store information
pertaining
to the program. Regular variables (called "local variables") only store
information for the duration of the handler in which they are used. They
are created simply by assigning them a value with the 'put' or 'set' commands.
- Global variables are in effect throughout the duration of the movie,
and are used for storage of info that needs to be kept around from handler
to handler. They need to be declared with the keyword 'global' in all the
handlers that access them.
- Next, the proper starting values are assigned to the global variables.
The total number of squares, and the squares per row, match the current layout
on the stage; the variable that will list the squares of the gameboard is
initially empty; the number of the first score channel used for gamepieces
lets us skip over any backdrop elements in lower-numbered channels; the column
and row coordinates of the "missing piece" (abbreviated to "the hole") are
computed from the dimensions of the game.
- The process of assigning a value for the first time is called
"initializing a variable", and Director expects this step to be completed
before the variable is accessed in the scripts.
- List variables are a fast and convenient way to track multiple
items, especially when the number of these items can change (in our case,
this allows us to easily modify the game so it has more, or fewer, gamepieces).
A linear list (the kind we are using) is indicated by square brackets
enclosing the items, separated by commas. An empty linear list is indicated
by the square brackets alone.
- Finally, one program object for each square on the gameboard is
created, and added to the end of the list variable.
- Each possible location (square) for the game pieces will be an object
that
the user interacts with. Note that it is not the gamepieces that are the
program objects, since their changing location would cause us to have to
work harder to keep track of them.
- Objects are created by sending the 'new' command to their parent script.
The result returned is a code (memory address) that Director can use to retrieve
the object. This code is what we append to our list of squares.
Create
a parent script
for the squares of the
gameboard.
- The handlers in the parent script determine which messages each of
its children (the objects created from the script) will be able to handle.
For this project, we need handlers for these messages:
- New: this handler is always present, and is used to set up the object
and return a code pointing to its location in memory.
- Click: what to do when the sprite attached to the object is clicked on.
- PieceCanMove: checks to see if the object's location is adjacent to the
"hole", so its gamepiece can move.
- MovePiece: what to do when the object is instructed to move its gamepiece.
- SetPicture: how to change the cast member assigned to the sprite attached
to the object.
- The properties are variables that persist throughout the life of
the object. Each object can store different values in its properties, allowing
it to have different attributes compared to its siblings.
Add
to the frame script already
created in the previous
session, so that user clicks will be intercepted.
- Since all of the sprites will responds to clicks in the same manner
(sending the click message to the appropriate object), it is more efficient
to put the mouseUp handler in the frame script rather than repeating it in
all sprites.
- To tell which part of the gameboard the user clicked, we use the clickOn
function, and send its result to another handler to take appropriate action.
Create
another movie script for
the handlers which need to execute while
the game is in progress.
- The handler in this script checks to see which part of the gameboard
originally received the mouseUp message. If it is the frame, it simply beeps.
Otherwise, it finds the object to which the sprite is attached, and sends
that object the 'click' message.
Run and test the movie. When done, make sure to save
your
work for refinements in the next session.
If you have the Shockwave plugin
properly
installed in your browser, you can see a
working
example of this second version of the puzzle. You can also
download an editable copy of the sample Director
movie (Director 5 for Macintosh format, Stuffed and BinHexed, 14,871 bytes).
Step-by-step instructions for the 2nd phase of the project
Re-open your movie
After the movie is up on the screen, you may need to again
position and size the stage:
File-->Preferences-->General, uncheck "Centered".
Modify-->Movie-->Properties, enter 240 x 240 for
the size, 0 and 20 for the location.
| return to outline |
Create a shape cast member
For the scripts to work, it is important that all cast
members used for gameboard squares appear in consecutive positions of the
Internal
Cast, as well as consecutive channels of frame 1 of the Score, and that this
new shape member be the last one.
Display the Cast window, if necessary, using the Window
menu.
Select position 16 in the Cast (the first one after the
bitmaps with the game pieces).
- If position 16 is already taken, click and drag on its thumbnail
and reposition it elsewhere in the score (the only items that need to be
at specific positions are the 16 gamepieces--all the other ones can be
anywhere).
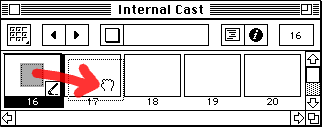
- Click on position 16 so that it is highlighted by a thick frame.
Display the Tool Palette, if necessary, using the
Window menu.

Select the unfilled Rectangle tool and use it to draw a
box directly on the Stage, in the lower-right location of the gameboard,
and the same size as the game piece
bitmaps.

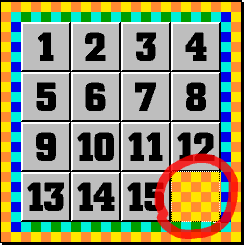
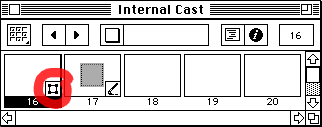
- After releasing the mouse button, the box will appear selected on
the Stage, where it can be repositioned (drag inside its outline), and resized
(drag the handles on its outline).
- A corresponding entry will appear in the Cast window, with the icon for
the Shape type.
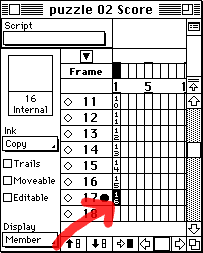
Make sure that the new sprite appears in the first
available channel of the first frame of the Score, after the bitmaps you
laid out in the previous session.
Use the Tool Palette controls to change the line settings
of the box to "No Line" to make the box completely invisible.

Use the Modify-->Sprite-->Properties dialog
to enter the location and size of the new sprite, so it fits in exactly with
the grid of squares on the gameboard.
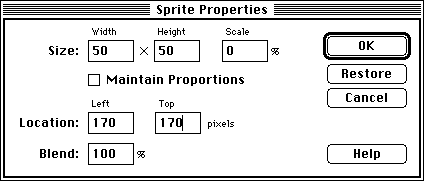
- In the example, the frame of the gameboard is 20 pixels wide, and
the game pieces are 50 pixels square. Consequently, the bottom-right location
of the gameboard is at 170 from the left and 170 from the top, and its size
is 50 x 50.
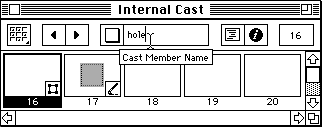
Since the box is invisible, its thumbnail in the Cast
window is blank. To make the cast member more recognizable, you might want
to enter a descriptive name for it, in the name field at the top of the Cast
window.
| return to outline |
Adjust registration point of bitmap cast
members
The registration point of bitmap cast members must be
set individually. You will need to repeat the following steps for each one
of the 15 game piece bitmaps:
Double-click the thumbnail of the game piece in the
cast window, to open the bitmap in the paint window.
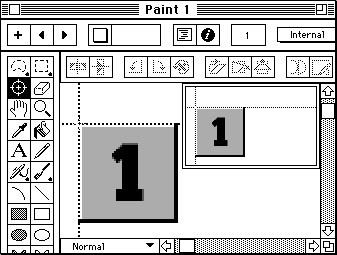
Select the registration point tool in the paint window's
toolbox. The current registration point will be diaplayed as the
intersection of two dotted lines.

Click on the first pixel at the upper-left corner of the
game piece. For greater accuracy you may want to zoom in first (in the View
menu).
To go on to the next bitmap, double click on its thumbnail
in the cast window, or click the "Next Cast Member" button in the
paint window.

| return to outline |
Mark game sprites as
editable
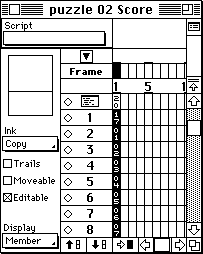
Display the score window (use the Window menu if necessary),
then select all the sprites representing gameboard squares:
Click and drag through the frame 1 cells that represent
elements of the game (background, squares, "missing piece"), so that they
are all selected.
Click on the "Editable" checkbox to mark it with an X.
Turn off the "Moveable" checkbox (this is no longer needed,
since the gamepieces will move under script control).
| return to outline |
Mark game piece cast members to highlight
when clicked
As for the registration point, the highlighting of
bitmap cast members must be set individually. You will need to repeat the
following steps for each one of the 15 game piece bitmaps (the "missing piece"
should obviously not highlight):
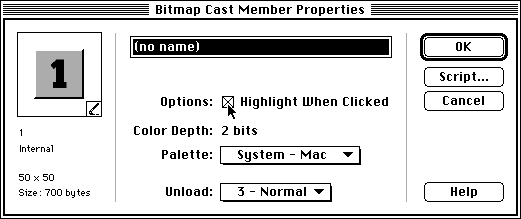
Display the cast window (use the Window menu if necessary)
Click on the thumbnail of the cast member to select it
Click on the Information ('i' in a circle) button at the
top of the Cast window, or use Modify-->Cast Member-->Properties.
Click on the "Highlight When Clicked" checkbox to mark
it with an X.
| return to outline |
Enter initialization movie script
Movie Scripts appear as members in the cast window, just
like the frame script entered in the previous session of the project.
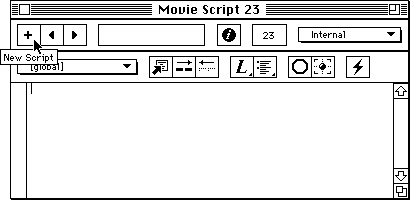
- If the script window is already open, click on its "plus" button
to create a new script, otherwise display the script window using the Window
menu (this should imediately create a blank new script cast member). In both
cases, you should end up with an empty window--check that the title bar does
say it's a movie script.
- To enter the scripts for this project, you can directly copy
text from the Web browser window and paste it into the script
window. If you prefer
to type in the program from scratch, take advantage of the "Alphabetical
Lingo"
button to enter statement templates--this saves time and minimizes misspellings.

The completed script should read as follows:
---------- Puzzle 02 -- phase 2 of the Puzzle project ------------
--------- Copyright 1996 by Sandro Corsi (corsi@ibm.net) ---------
--The scripts in this movie assume that the cast members with the
--images of the gamepieces are arranged sequentially at the
--beginning of the internal cast. The cast member for the missing
--piece (an unfilled, unstroked box shape) is the last gamepiece
--cast member.
--It is also assumed that the gamepiece sprites are arranged
--sequentially in the score, after any mumber of sprites used
--to create the background of the gameboard. The sprite for the
--missing piece comes right after the gamepiece sprites.
------------------------------------------------------------------
on startMovie
  --------------- declare global variables ---------------
  -- game size specifications
  global gNumberOfSquares, gSquaresPerRow
  -- Squares (= available positions for gamepieces)
  global gSquareList, gSquareChannelStart, gHoleColumn, gHoleRow

  --------------- initialize global variables ---------------
  put 16 into gNumberOfSquares -- total available Squares
  put 4 into gSquaresPerRow -- how many Squares wide is each row
  put [] into gSquareList -- list of child objects representing Squares
  put 2 into gSquareChannelStart -- first channel containing Square sprite
  -- initialize missing gamepiece position to be the last Square
  put (gNumberOfSquares-1) mod gSquaresPerRow+1 into gHoleColumn
  put (gNumberOfSquares-1)/gSquaresPerRow+1 into gHoleRow

  --------------- create Square objects ---------------
  repeat with SquarePosition = 1 to gNumberOfSquares
    append gSquareList, new(script "SquareParentScript", SquarePosition)
  end repeat
  updateStage -- force redraw
end
- Verify that the syntax is correct by watching the type alignment
after
pressing the TAB key.
- In the text above, the lines beginning with two (or more) hyphens are
comments. They are very important in that they clarify the meaning
of the script, but for the purpose of this project they can be omitted.
| return to outline |
Enter parent script for squares
Parent scripts must be entered as movie scripts. They
must be named with the exact same name used in the statement that creates
the objects:
Click on the "plus" button
of the script window to create a blank new movie script. Check again
that the title bar reports this as a movie script.
Click to place the insertion point in the cast member name
field (at the top-center of the script window) and type the name
SquareParentScript
Place the insertion point back in the body of the window,
and enter the following script:
property pSpriteOfSquare, pColumnOfSquare, pRowOfSquare
on new me, position
  global gSquareChannelStart, gSquaresPerRow
  set pSpriteOfSquare to position-1+gSquareChannelStart
  set the puppet of sprite pSpriteOfSquare to TRUE
  set the memberNum of sprite pSpriteOfSquare to position
  put (position-1) mod gSquaresPerRow+1 into pColumnOfSquare
  put (position-1)/gSquaresPerRow+1 into pRowOfSquare
  return me
end
on click me
  if pieceCanMove(me) then
    beep
    movePiece me
  else
    beep 2 -- not a smart move
  end if
end
on pieceCanMove me -- is Square just left, right, above, or below hole?
  global gHoleColumn, gHoleRow
  if pColumnOfSquare = gHoleColumn then
    if pRowOfSquare = gHoleRow-1 then return TRUE --just above hole
    if pRowOfSquare = gHoleRow+1 then return TRUE --just below hole
  end if -- same column
  if pRowOfSquare = gHoleRow then
    if pColumnOfSquare = gHoleColumn-1 then return TRUE --just left of hole
    if pColumnOfSquare = gHoleColumn+1 then return TRUE --just right of hole
  end if -- same row
  return FALSE
end
on movePiece me -- trade places with hole
  global gHoleColumn, gHoleRow, gSquaresPerRow, gNumberOfSquares
  -- assign my current cast member to sprite at former hole location
  put (gHoleRow-1) * gSquaresPerRow + gHoleColumn into holePosition
  setPicture getAt(gSquareList, holePosition), the memberNum of sprite pSpriteOfSquare
  -- assign hole cast member (it's right after all gamepiece pictures)
  -- to my sprite
  set the memberNum of sprite pSpriteOfSquare to gNumberOfSquares
  -- copy my location to hole location globals
  put pColumnOfSquare into gHoleColumn
  put pRowOfSquare into gHoleRow
  -- force redraw
  updateStage
end
on setPicture me, memberNumber
  set the memberNum of sprite pSpriteOfSquare to memberNumber
end
Verify that the syntax of this script is correct
as well.
| return to outline |
Modify the frame script to capture
mouse clicks
Individual scripts can contain multiple handers, and the
handlers can be added at any time.
Double-click on the first frame cell of the script
channel in the score to re-open the frame script in the script window.
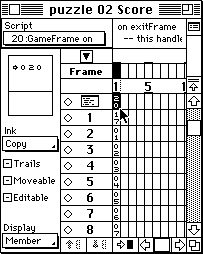
Click to place the insertion point at the end of the script,
after the handler that's already there. Enter the new handler so that the
entire script reads:
on exitFrame
  -- this handler keeps the movie looping on this frame
  go to the frame
end
on mouseUp
  --The clickOn returns the sprite clicked, or 0 if stage clicked.
  --For this to work, the sprites must be active, i.e., they must
  --either have a script attached, or be marked editable in Score
  gameClick (the clickOn) -- handled in GamePlay script
end
Take care to verify your spelling once again.
| return to outline |
Create additional movie script with gameplay
handlers
You may want to identify this movie script cast member
by name (e.g., "gameplay"), so it is easier to locate. A name is only
required for parent scripts, though.
Click on the "plus" button
of the script window to create a blank new movie script. Check again
that the title bar reports this as a movie script.
Enter the following script:
on gameClick whichSprite
  --this handler responds to user input based on the part
  --of the game board clicked
  global gSquareChannelStart, gSquareList
  if whichSprite < gSquareChannelStart then
    beep 3 -- you clicked the frame of the gameboard
  else
    --find which Square location was clicked
    put whichSprite - gSquareChannelStart + 1 into position
    --tell the Square to respond to the click
    click getAt(gSquareList, position)
  end if
end
If this script is entered correctly, you are now
ready
to test the puzzle.
| return to outline |
Copyright 1996 by
Sandro Corsi.
Last modified 4 OCT 96.


![]()

![]()


