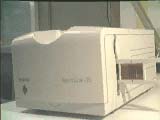
The Polaroid SprintScan 35 slide and negative scanner
|
SaneDraw Home |
Instructor Home |
learning resources |
ACG Home |
This device will allow you to input 35mm photographs, both
negative and reversal film. The advantages over using our current flatbed
scanners are:
Direct scanning from film, without the generation loss
(drop in quality) associated with creating a photographic print.
Greater dynamic range in the original. The range of values
in reflective artwork (like a photo print) is as much as 10 times less than
in a transparency.
Greater bit depth of the scanner, to better match the range
of values in the original. The SprintScan captures 30 bits per pixel of color
information, as opposed to the 24 bits per pixel recorded by the Hewlett-Packard
flatbeds.
Finer resolution, allowing a full-frame image to be enlarged
to letter-size output at the standard halftone resolutions used in magazine
publishing. The SprintScan offers a 2700 dpi optical resolution which, over
the full width of a 35mm still frame, yields approx. 3700 pixels. This figure
is comparable to the highest resolution in a standard PhotoCD ImagePak.
Generally greater speed. The SprintScan lives up to its
name by providing quick previews and final scans.
The obvious tradeoff is that this device will not accept other materials
besides photographic film. In addition, film sizes larger than 35mm will
not fit in the scanner, and it is also impractical to scan smaller formats,
since no holders are available for them.
Below you will find instructions on the basic
operation of the scanner--these will suffice for most properly exposed
originals. For more challenging images, read also the
instructions
for exposure and color correction. The latter allow you to take full
advantage of the scanner's quality, since corrections done before scanning
(working on the original 30-bit data) will yield better results than the
same corrections done after scanning, in Photoshop (where you are working
on 24-bit data).
The SprintScan is not a network device. It can therefore be used
only through the computer directly connected to it. The scanner is operated
from inside Photoshop, using an acquire plug-in.
- Set up the computer and the scanner so that they will operate properly
- Turn on the SprintScan (there's a switch on the back-right) and all
other SCSI devices hooked up to the computer (as of this writing, this
means the CD-ROM drive on the left of the computer, which has a switch
on its right side).
- Turn on the computer. Immediately press and hold down the spacebar
until the Extensions Manager window comes up, then check that the set
(indicated by the pop-up menu at the top of the window) is "SprintScan".
Close the Extensions Manager window, allowing the computer to complete
booting up.
- Turn on the second monitor (the one with the 'Electrohome' nameplate)
and set it to RGB display by simultaneously pressing the Command (= Apple)
key and the equals key at the top of the numeric keypad until the
light on the lower-right of the front of the monitor turns green.
- Locate the Photoshop application icon (in the Paint folder on the
hard drive) and double-click on it.
- Pull down the File menu, then the Acquire submenu, and select the
SprintScan 35 command
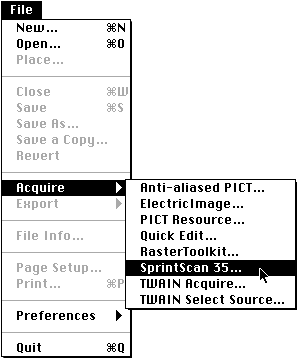
- The SprintScan control palette and preview window will appear. Notice
also that Photoshop's menus will be replaced by the
plug-in's.
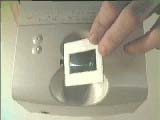
- Insert the original in the scanner, with the emulsion side facing towards
the back of the scanner, and the top of the image pointing down. Use light
reflections to help you identify the emulsion side (it is duller, and the
images appear to have a faint raised edge).
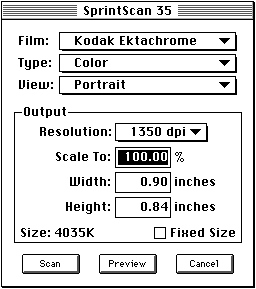
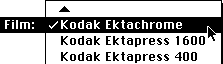
- Select the film type that matches the original emulsion from the Film
pop-up menu.
- Select Color or Grayscale scanning from the Type pop-up
menu.

- Select Landscape or Portrait orientation from the View pop-up
menu. Super Slide is a square format used occasionally for
audiovisual presentations.
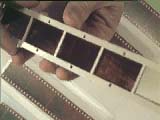
Note: filmstrip frames
must be scanned in
Landscape view, regardless of the actual orientation of the image (which
can be rotated later in
Photoshop).

- Click the Preview
button.

- Once the image appears in the Preview window, adjust the cropping frame
using the cropping
tool.

- Click the Auto Expose button to force a new exposure calculation
based on the new cropping area.

- Select a value from the resolution pop-up menu. While you can enter
any resolution, the values listed are the scanner's "native resolutions",
which will provide better results. Also, keep an eye on the Size figure,
so that you do not exceed your disk capacity.

- Click the Scan button.

- After the scan completes, a new untitled window containing
the scanned image appears, and Photoshop's menus are restored. The window
is a normal Photoshop document, which you can proceed to save in any
supported format using the File menu.
| return to top |
The following assume that you have already clicked on "Preview" and
that the preview window with the image is on the screen.
- In the Preferences dialog, the exposure and cast detection operations
can be set to run automatically as soon as the preview image appears (otherwise,
it is necessary to click the Auto Exposure button). It
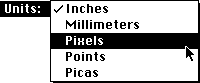
is also possible to choose the measurement
units
displayed in the main SprintScan
palette.
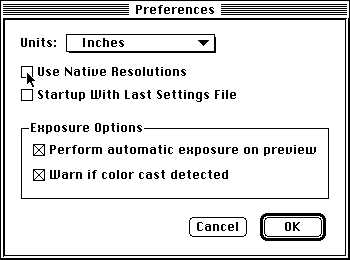
Before 'Pixels' can be selected as the units, 'Use Native Resolutions'
must be unchecked. The program will no longer enforce the use of the best
resolutions, though it is still possible to select them manually.
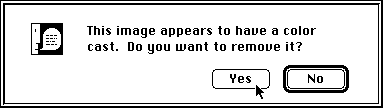
- If the the program detects a color cast in the image, the following
alert will appear. Unless there is a reason for the cast (e.g., the photo
was shot at sunset) it is always a good idea to remove it. The
same alert will appear again every time you click on the Auto Expose
button.
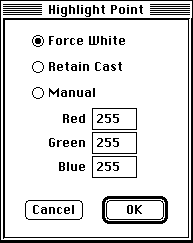
- The Highlight Point
tool is used to indicate the brightest value in the final
scan.

Its dialog allows setting the color
assigned to the value selected by the tool (all other values will
be adjusted proportionally). 'Force White' will
remove color casts, while 'Retain Cast' will use the brightest value that
still shows the dominant color. Any color can be assigned
manually.
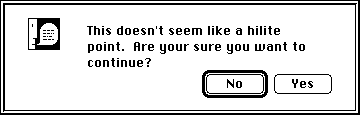
If a dark area of the picture is clicked with the Highlight Tool, the followingn
dialog appears.
You may still want to proceed for a special effect, or to improve the appearance
of a small part of the picture while allowing the rest of the image to be
clipped (= forced to
white).
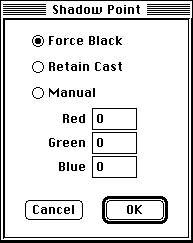
- The Shadow Point tool works similarly to indicate the darkest value in
the
picture.

Similarly, the Shadow
dialog allows removing (Force Black) or retaining the color cast in the darkest
values.
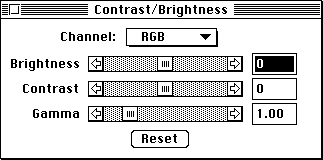
- The Contrast and Brightness dialog allows you to make manual exposure
adjustments.
- In the same menu you can bring up the
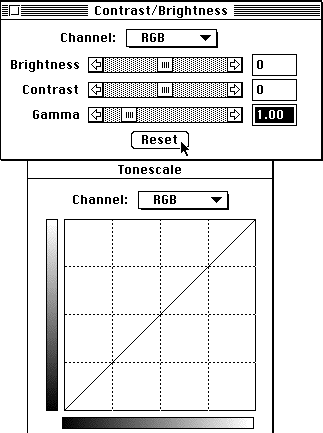
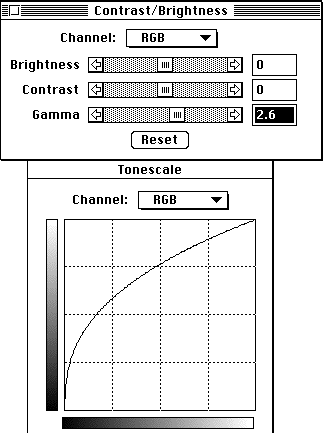
Tonescale palette, which will display a graph showing the Contrast/Brightness
settings in the same manner as in the Curves dialog in Photoshop (unlike
in Photoshop, however, you cannot adjust the graph directly).
- The normal Gamma
settings (obtained by clicking
'Reset').
- A high Gamma
setting.
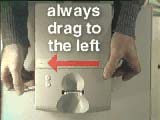
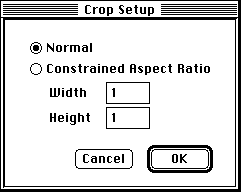
- The Crop Setup dialog fine-tunes the operation of the
crop
tool.
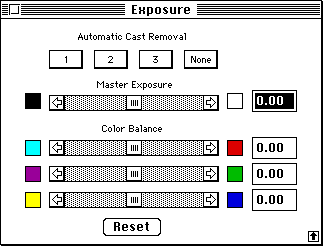
- The Exposure dialog, in its collapsed state, allows setting the level
for all colors equally.
If the original is negative film, it is also possible to remove color casts
using three preset methods by clicking on the Automatic Cast Removal buttons.
These buttons are disabled when scanning reversal film
(slides).
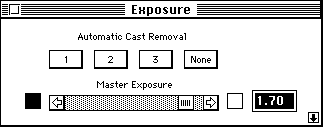
The dialog expands by clicking on the arrow button at the lower-right corner.
Additional
sliders become available to remove color casts
manually.
- The Saturation dialog provides sliders to control separately the three
color components (to quickly make the same adjustment on all components,
check 'Link Colors'). If the sliders are turned all the way down, the
image becomes
grayscale.

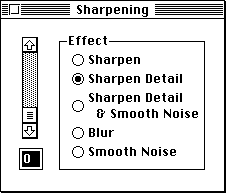
- The Sharpening dialog lets you minimize artifacts and lack of focus in
the
image.
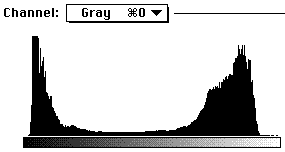
- After scanning, the Image-->Histogram command will display a graph
of the tonal distribution in
the image. A properly exposed and scanned image will display a broad
range of
values.
| return to top |
Last updated by
Sandro Corsi on 6 NOV
96